Complete Setup and Usage Guide: On-Prem AI + SCIM with Microsoft Entra
This guide is designed to help you get started with Swimm, and to provide you with a quick reference for the most common tasks you'll perform while using Swimm.
This comprehensive guide covers everything from technical workspace setup to day-to-day usage of Swimm. It's designed for both administrators configuring the workspace and team members using Swimm.
Part 1: Workspace Setup (For Administrators)
This section covers the technical setup required by workspace administrators before team members can start using Swimm.
1.1 On-Prem AI Setup
Swimm's On-Prem Agent is a dedicated server running in a container within your company's network. It grants Swimm access to services you host internally (like Azure OpenAI) without sharing credentials directly with Swimm, keeping your keys confidential and private.
Prerequisites
Before deploying the On-Prem Agent, ensure you have:
-
Azure OpenAI models for GPT-4.1, GPT-4.1 mini, and GPT-3.5 Turbo Instruct if deploying for AI features:
- API Key
- Deployment URL
See:
-
The server is required to be deployed with HTTPS/TLS configured with a certificate trusted by your organization's computers. See TLS Configuration.
-
The deployed container will be exposed to the Swimm IDE extension and web page in order to bridge Azure OpenAI with Swimm. Make sure that your network allows inbound traffic to this container from the developers' machines.
-
The server requires access to the domain https://app.swimm.io to function correctly, please make sure that is allowed.
-
If you direct the agent to connect to Azure OpenAI via a forward/reverse proxy/VPN, and that proxy/VPN does TLS Man-in-the-Middle (MITM), you will need to configure the On-Prem Agent to trust the certificate of the proxy/VPN. You can configure an additional certificate bundle that the On-Prem Agent will use by using the
NODE_EXTRA_CA_CERTSenvironment variable. See the FAQ for more details. -
Swimm uses Azure OpenAI streaming API, the On-Prem Agent will stream the responses from the Azure OpenAPI instance using SSE (Server-Sent Events) the same as a direct streaming request to Azure OpenAI. Make sure that your network, load balancer/proxy, and container orchestration platform allows SSE. You can verify this by checking documentation of your load balancer/proxy/container orchestration platform, or by asking the relevant personnel at your organization that is responsible for it.
Technical Details
- The server listens on port
24605inside the container by default, this can be overriden using thePORTenvironment variable. Though you can also always remap the outside port using Docker port mapping. - The server has an HTTP health check endpoint at
/health. - The path to the configuration file inside the container defaults to
/etc/swimm/onprem-agent.yaml, but can be overriden using theCONFIG_PATHenvironment variable.
Deploying Models
To use Swimm's On-Prem Agent with your own Azure OpenAI instance, you need to deploy the required models in your Azure OpenAI resource.
Microsoft documentation: How to deploy Azure OpenAI models with Azure AI Foundry
-
Enter Azure AI Foundry, creating or selecting the correct Azure OpenAI resources at the top.
Or enter Azure Portal → Azure OpenAI → Create/Select OpenAI Resource → Explore Azure AI Foundry Portal
-
Select Deployments in the sidebar.
-
Select Deploy model.
-
Deploy gpt-4.1, gpt-4.1-mini and gpt-35-turbo-instruct with a name of your choice.
How to Get the Deployment URL
Click your deployed model in the Azure AI Foundry portal to see its target URI. The URL you need is
without the /chat/completions and ?api-version=* suffixes. For
example:
| URL | |
|---|---|
| Good ✅ | https://ai-resource.openai.azure.com/openai/deployments/{deployment-name} |
| Bad ❌ | https://ai-resource.openai.azure.com/openai/deployments/{deployment-name}/chat/completions?api-version=2025-01-01-preview |
Installation Steps
Step 1: Pull the Docker Image
If needed, pull the latest version of the image using:
docker pull swimmio/onprem-agent:3 # From Docker Hub
# Or
docker pull us-docker.pkg.dev/swimmio/public/onprem-agent:3 # From Google Artifact Registry
The image is on Docker Hub swimmio/onprem-agent and Google Artifact Registry. You can see the available tags there if you want to pin the version to have more control over updates. We publish the following tags:
latest- Always the latest version.3,2,1- The latest release for each major version (e.g.,3is the latest major version 3).3.0.0- A specific version.
In case you don't want to, or have no access, to use Docker Hub or Google Artifact Registry, you can also mirror the image:
Mirroring
docker save swimmio/onprem-agent:3 --platform linux/amd64 -o swimm-onprem-agent-3.tar # From Docker Hub
# Or
docker save us-docker.pkg.dev/swimmio/public/onprem-agent:3 --platform linux/amd64 -o swimm-onprem-agent-3.tar # From Google Artifact Registry
And then to load the image:
docker load -i swimm-onprem-agent-3.tar
And if needed you can also push it to a registry:
docker tag <image> <your-registry>/<image> # e.g. docker tag swimmio/onprem-agent:latest registry.foo.test/swimmio/onprem-agent:latest
docker push <your-registry>/<image> # e.g. docker push registry.foo.test/swimmio/onprem-agent:latest
Step 2: Configure the Agent
Configuring On-prem Enterprise Git Provider (if needed)
The git section in the swimm-onprem-agent.yaml file is only relevant for workspaces using on-premises git providers: GitHub Enterprise Server and GitLab Server.
For more information on how to create a Swimm OAuth App for your on-prem Git hosting, please refer to the following instructions:
Bitbucket Data Center does not require the On-Prem Agent configuration. Instead, send Swimm your Client ID, Client Secret, and Bitbucket Data Center URL for your setup.
Creating the Configuration File
Create your configuration file using the template below:
For enhanced YAML editing experience with autocompletion and validation:
- Install the YAML extension
- Include the
yaml-language-servercomment at the top of the configuration file with the JSON Schema: https://docs.swimm.io/schemas/onprem-agent-config.json
Configuration sections:
git
- GitHub Enterprise Server and GitLab Server only.
- If you're using on-premises Bitbucket Data Center or cloud-hosted git providers (GitHub.com, GitLab.com, Bitbucket Cloud and Azure DevOps), you should remove the entire
gitsection.
ai
- Configure your Azure OpenAI deployments and API credentials for AI features.
- If you're not using on-premises AI features, you should remove the entire
aisection.
# yaml-language-server: $schema=https://docs.swimm.io/schemas/onprem-agent-config.json

# For single-tenant customers only, configure the URL of your Swimm instance (e.g. https://foo-bar-swimm.com)
# swimmBaseUrl: <swimm_instance_url>

# For configuring On-Prem/Enterprise Git Provider authentication (GitHub Enterprise Server / GitLab Server only), remove if Bitbucket Data Center or cloud git providers are used
git:
  provider: <github | gitlab>
  host: <git_server_url>
  oauth:
    clientId: <client_id>
    clientSecret: <client_secret>

# For configuring AI features, remove if not used
ai:
  models:
    short:
      provider: azureOpenAI
      deployment: <gpt-4.1-mini-deployment-name>
      model: gpt-4.1-mini
    long:
      provider: azureOpenAI
      deployment: <gpt-4.1-deployment-name>
      model: gpt-4.1
    completion:
      provider: azureOpenAI
      deployment: <gpt-35-turbo-instruct-deployment-name>
      model: gpt-3.5-turbo-instruct

  providers:
    azureOpenAI:
      endpoint: https://<azure-openai-resource>.openai.azure.com
      apiKey: <azure_openai_api_key>
Step 3: Deploy the Agent
The On-Prem Agent is a Docker container that can be deployed on any platform. Choose your deployment method:
- Docker
- Docker Compose
- Kubernetes
- ECS
- Azure Container Apps
- Azure Container Instances
- Google Cloud Run
Assuming your configuration file is in the current working directory and
named swimm-onprem-agent.yaml.
docker run -d \
  -p 24605:24605 \
  -v $PWD/swimm-onprem-agent.yaml:/etc/swimm/onprem-agent.yaml:ro \
  -e CONFIG_PATH=/etc/swimm/onprem-agent.yaml \
  swimmio/onprem-agent:3
The path on the left hand side of -v must be absolute, we use $PWD to make it absolute.
Assuming your configuration file is in the current working directory and
named swimm-onprem-agent.yaml, and you place compose.yaml alongside it.
services:
  onprem-agent:
    image: swimmio/onprem-agent:3
    ports:
      - 24605:24605
    volumes:
      - ./swimm-onprem-agent.yaml:/etc/swimm/onprem-agent.yaml:ro
    environment:
      CONFIG_PATH: /etc/swimm/onprem-agent.yaml
docker compose up -d
apiVersion: v1
kind: Secret
metadata:
  name: onprem-agent-config
# Replace <onprem-agent-config> with the contents of your configuration file
# properly indented, or use kubectl create secret or kustomize using
# secretGenerator to load this from a file, or any such similar tool
stringData:
  onprem-agent.yaml: |
    <onprem-agent-config>
apiVersion: apps/v1
kind: Deployment
metadata:
  name: onprem-agent
  labels:
    app: onprem-agent
spec:
  selector:
    matchLabels:
      app: onprem-agent
  template:
    metadata:
      labels:
        app: onprem-agent
    spec:
      containers:
      - name: onprem-agent
        image: swimmio/onprem-agent:3 # Should probably pin to a specific version, e.g. swimmio/onprem-agent:3.0.0 due to how Kubernetes works
        ports:
        - containerPort: 24605
        volumeMounts:
        - name: config
          mountPath: /etc/swimm
          readOnly: true
        env:
        - name: CONFIG_PATH
          value: /etc/swimm/onprem-agent.yaml
        resources:
          requests:
            memory: 512Mi
            cpu: '1'
          limits:
            memory: 512Mi
            cpu: '1'
        readinessProbe:
          initialDelaySeconds: 5
          periodSeconds: 3
          httpGet:
            port: 24605
            path: /health
            # Uncomment if you configured TLS in the On-Prem Agent configuration
            # scheme: HTTPS
        # TODO Do we want a livenessProbe?
      volumes:
      - name: config
        secret:
          secretName: onprem-agent-config
      securityContext:
        runAsNonRoot: true
And then take your pick of the way to expose the service, note that you need to configure HTTPS:
- Ingress
- Gateway
- LoadBalancer
# You will need to configure longer request timeouts, the way to do so varies by the Kuberenets distribution and Ingress controller you are using.
apiVersion: v1
kind: Service
metadata:
  name: onprem-agent-ingress-svc
spec:
  type: NodePort
  selector:
    app: onprem-agent
  ports:
  - port: 24605
---
apiVersion: networking.k8s.io/v1
kind: Ingress
metadata:
  name: onprem-agent
spec:
  # ingressClassName: nginx
  rules:
  - http:
      paths:
      - path: /
        pathType: Prefix
        backend:
          service:
            name: onprem-agent-ingress-svc
            port:
              number: 24605
You will need to create your own Gateway resource with HTTPS/TLS, and then use the HTTPRoute below replacing its name.
For example:
apiVersion: gateway.networking.k8s.io/v1
kind: Gateway
metadata:
  name: onprem-agent
spec:
  gatewayClassName: nginx
  listeners:
  - name: https
    protocol: HTTPS
    port: 443
    hostname: onprem-agent.example.internal
    tls:
      mode: Terminate # If protocol is `TLS`, `Passthrough` is a possible mode
      certificateRefs:
      - group: ""
        kind: Secret
        name: <onprem-agent-cert>
And then create the Service and HTTPRoute:
# You will need to configure longer request timeouts, the way to do so varies by the Kuberenets distribution and Gateway controller you are using.
apiVersion: v1
kind: Service
metadata:
  name: onprem-agent-gateway-svc
spec:
  type: NodePort
  selector:
    app: onprem-agent
  ports:
  - port: 24605
---
apiVersion: gateway.networking.k8s.io/v1
kind: HTTPRoute
metadata:
  name: onprem-agent-httproute
spec:
  parentRefs:
  - name: <onprem-agent-gateway>
  rules:
  - backendRefs:
    - name: onprem-agent-gateway-svc
      port: 24605
# You will need to configure longer request timeouts, the way to do so varies by the Kuberenets distribution and LoadBalancer type you are using (Some kinds don't have a timeout).
apiVersion: v1
kind: Service
metadata:
  name: onprem-agent
spec:
  # You will need to configure HTTPS in the load balancer, or use a separate proxy that and NodePort
  type: LoadBalancer
  selector:
    app: onprem-agent
  ports:
  - port: 8080 # Or 443 if you configured HTTPS in the onprem-agent config
    targetPort: 24605
This are instructions using the AWS CLI and using a Bourne-like shell (e.g.
Bash, Zsh), adapt them to your specific shell as needed.
You can also use the AWS console instead to perform similar steps. Adapt the instructions as needed to suit your requirements, e.g. ECS cluster using Fargate or EC2, etc. Make sure that the AWS CLI is configured with the correct project, credentials, and region.
This are basic instructions that assume you have a public/organization private domain that you can get a certificate to assign to the load balancer via ACM (Automatic or import). You can also choose to let the On-Prem Agent handle TLS if you have a fixed certificate or expose the On-Prem Agent directly with no load balancer and replication, use a VPC with NAT and no public IPs, assign rules so that the load balancer only responds to the correct host name, and other tweaks.
You can view your AWS account ID using:
aws sts get-caller-identity --query Account --output text
-
Create a IAM role for access to the configuration secret:
aws iam create-role --role-name SwimmOnPremAgentRole --assume-role-policy-document file://ecs-trust-policy.jsonecs-trust-policy.json{
"Version": "2012-10-17",
"Statement": [
{
"Effect": "Allow",
"Principal": {
"Service": "ecs-tasks.amazonaws.com"
},
"Action": "sts:AssumeRole"
}
]
} -
Create a secret in AWS Secrets Manager with the configuration file:
aws secretsmanager create-secret --name onprem-agent-config --secret-string file://swimm-onprem-agent.yaml -
Give permissions to the IAM role to access the secret (Replace
{AccountID}with your AWS account ID):aws secretsmanager put-resource-policy --secret-id onprem-agent-config --resource-policy file://config-resource-policy.jsonconfig-trust-policy.json{
"Version": "2012-10-17",
"Statement": [
{
"Effect": "Allow",
"Principal": {
"AWS": "arn:aws:iam::{AccountID}:role/SwimmOnPremAgentRole"
},
"Action": "secretsmanager:GetSecretValue",
"Resource": "*"
}
]
} -
Create an ECS task definition (Replace
{AccountID}with your AWS account ID):aws ecs register-task-definition --cli-input-json file://onprem-agent-task.jsononprem-agent-task.json{
"family": "swimm-onprem-agent",
"containerDefinitions": [
{
"name": "onprem-agent",
"image": "swimmio/onprem-agent:3",
"cpu": 0,
"portMappings": [
{
"name": "http",
"containerPort": 24605,
"hostPort": 24605,
"protocol": "tcp",
"appProtocol": "http"
}
],
"essential": true,
"environment": [
{
"name": "CONFIG_PATH",
"value": "/etc/swimm/onprem-agent.yaml"
}
],
"environmentFiles": [],
"mountPoints": [
{
"sourceVolume": "config",
"containerPath": "/etc/swimm",
"readOnly": true
}
],
"volumesFrom": [],
"dependsOn": [
{
"containerName": "files-composer",
"condition": "SUCCESS"
}
],
"ulimits": [],
"logConfiguration": {
"logDriver": "awslogs",
"options": {
"awslogs-group": "/ecs/swimm-onprem-agent",
"mode": "non-blocking",
"awslogs-create-group": "true",
"max-buffer-size": "25m",
"awslogs-region": "us-east-1",
"awslogs-stream-prefix": "ecs"
},
"secretOptions": []
},
"healthCheck": {
"command": [
"curl",
"-f",
"http://localhost:24605/health"
],
"interval": 30,
"timeout": 2,
"retries": 3,
"startPeriod": 5
},
"systemControls": []
},
{
"name": "files-composer",
"image": "public.ecr.aws/compose-x/ecs-files-composer:latest",
"cpu": 0,
"portMappings": [],
"essential": false,
"environment": [
{
"name": "ECS_CONFIG_CONTENT",
"value": "{\"files\": {\"/etc/swimm/onprem-agent.yaml\": {\"source\": {\"Secret\": {\"SecretId\": \"onprem-agent-config\"}}}}}"
}
],
"environmentFiles": [],
"mountPoints": [
{
"sourceVolume": "config",
"containerPath": "/etc/swimm",
"readOnly": false
}
],
"volumesFrom": [],
"logConfiguration": {
"logDriver": "awslogs",
"options": {
"awslogs-group": "/ecs/swimm-onprem-agent",
"mode": "non-blocking",
"awslogs-create-group": "true",
"max-buffer-size": "25m",
"awslogs-region": "us-east-1",
"awslogs-stream-prefix": "ecs"
},
"secretOptions": []
},
"systemControls": []
}
],
"taskRoleArn": "arn:aws:iam::{AccountID}:role/SwimmOnPremAgentRole",
"executionRoleArn": "arn:aws:iam::{AccountID}:role/ecsTaskExecutionRole",
"networkMode": "awsvpc",
"volumes": [
{
"name": "config",
"host": {}
}
],
"placementConstraints": [],
"requiresCompatibilities": [
"FARGATE"
],
"cpu": "1024",
"memory": "2048",
"runtimePlatform": {
"cpuArchitecture": "X86_64",
"operatingSystemFamily": "LINUX"
},
"enableFaultInjection": false
} -
Create or choose an ECS cluster:
# To create a dedicated cluster
aws ecs create-cluster --cluster-name onprem-agent-cluster --capacity-providers FARGATE FARGATE_SPOT --default-capacity-provider-strategy FARGATE

# Or just use an existing cluster of your choice -
Create an application load balancer:
lb_group_id=$(aws ec2 create-security-group --group-name swimm-onprem-agent-lb --description "Swimm On-Prem Agent LB" --query 'GroupId' --output text)
aws ec2 authorize-security-group-ingress --group-id $lb_group_id --protocol tcp --port 80 --cidr 0.0.0.0/0
aws ec2 authorize-security-group-ingress --group-id $lb_group_id --protocol tcp --port 443 --cidr 0.0.0.0/0

# Pick subnets, you can also use the AWS console (https://us-east-1.console.aws.amazon.com/vpcconsole/home#subnets:)
aws ec2 describe-subnets

# Use the security group ID from the previous command
load_balancer=$(aws elbv2 create-load-balancer \
  --name swimm-onprem-agent-lb \
  --subnets "<subnets>" \
  --security-groups $lb_group_id \
  --query 'LoadBalancers[0].LoadBalancerArn' \
  --output text)

# List VPCs, you can also use the AWS console (https://us-east-1.console.aws.amazon.com/vpcconsole/home#vpcs:)
aws ec2 describe-vpcs

# Create a target group, specify the VPC ID
target_group=$(aws elbv2 create-target-group --name=test --protocol=HTTP --port=80 --target-type=ip --vpc-id "<vpc>" --query 'TargetGroups[0].TargetGroupArn' --output text)

aws elbv2 create-listener \
  --load-balancer-arn $load_balancer \
  --protocol HTTP --port 80 \
  --default-actions "Type=redirect,RedirectConfig={Protocol=HTTPS,StatusCode=HTTP_301}"
aws elbv2 create-listeners \
  --load-balancer-arn $load_balancer \
  --protocol HTTPS --port 443 \
  --certificates "CertificateArn=<certificate-arn>" \
--default-actions "Type=forward,TargetGroupArn=$target_group" -
Create the service (Replace with your correct cluster):
group_id=$(aws ec2 create-security-group --group-name swimm-onprem-agent --description "Swimm On-Prem Agent" --output text --query 'GroupId')
aws ec2 authorize-security-group-ingress --group-id $group_id --protocol tcp --port 24605 --source-group $lb_group_id

# Pick subnets, you can also use the AWS console (https://us-east-1.console.aws.amazon.com/vpcconsole/home#subnets:), you can use the same as the load balancer
aws ecs create-service \
  --cluster onprem-agent-cluster \
  --service-name swimm-onprem-agent \
  --task-definition swimm-onprem-agent \$
  --desired-count 1 \
  --launch-type FARGATE \
  --network-configuration "awsvpcConfiguration={subnets=[<subnets>],securityGroups=[$group_id],assignPublicIp=ENABLED}" \
  --load-balancer "targetGroupArn=$target_group,containerName=onprem-agent,containerPort=24605"
This are instructions using the Azure CLI and using a Bourne-like shell
(e.g. Bash, Zsh), adapt them to your specific shell as needed. Make sure
that you are logged in to the right subscription.
You can also use the Azure Portal instead to perform similar steps. Though you will have to convert the YAML to JSON to submit it using the portal. Adapt the instructions as needed to suit your requirements.
-
First you need to select or create a resource group:
# List resource groups
az group list

# Create a resrouce group
az group create --name <resource-group> --location <location> -
Select or create a container apps environment:
# List container apps environments
az containerapp env list [--resource-group <resource-group-name>]

# Create a container apps environment
az containerapp env create --name swimm-onprem-agent --resource-group <resource-group> --location <location> -
Deploy the swimm-onprem-agent using the YAML file, replace
<onprem-agent-config>with the contents of your config file in the YAML file:swimm-onprem-agent.yamlproperties:
configuration:
ingress:
external: true
allowInsecure: false
targetPort: 24605
secrets:
- name: config
value: |
<onprem-agent-config>
template:
containers:
- image: docker.io/swimmio/onprem-agent:3
name: swimm-onprem-agent
resources:
cpu: 1
ephemeralStorage: 4Gi
memory: 2Gi
env:
- name: CONFIG_PATH
value: /etc/swimm/onprem-agent.yaml
volumeMounts:
- mountPath: /etc/swimm
volumeName: config
probes:
- type: Readiness
initialDelaySeconds: 5
periodSeconds: 3
httpGet:
path: /health
port: 24605
scheme: HTTP
volumes:
- name: config
storageType: Secret
secrets:
- secretRef: config
path: onprem-agent.yamlaz containerapp create \
--resource-group <resource-group> \
--environment <container-apps-environment> \
--name swimm-onprem-agent \
--yaml swimm-onprem-agent.yamlNote that you can also reference the config file from a secret in Azure Key Vault. You will need add
Identityto the container app and give it access to the Key Vault secret, and specifykeyVaultUrlandidentityfor the secret instead ofvaluein the YAML file. -
To see the service URL, run:
az containerapp show --resource-group <resource-group> --name swimm-onprem-agent --query properties.latestRevisionFqdn --output tsv
This are instructions using the Azure CLI and using a Bourne-like shell
(e.g. Bash, Zsh), adapt them to your specific shell as needed. Make sure
that you are logged in to the right subscription.
Adapt the instructions as needed to suit your requirements.
Note that this configuration is more difficult to setup TLS for than container apps which has automatic TLS. You will need to configure TLS in the On-Prem Agent configuration or TLS termination using some other service in front of the container,
-
First you need to select or create a resource group:
# List resource groups
az group list

# Create a resrouce group
az group create --name <resource-group> --location <location> -
Create the instance using the given YAML file, replace
<base64-encoded-onprem-agent-config>with the base64 encoded contents of your config file, and consider filling in or removinglogAnalytics:swimm-onprem-agent.yamlapiVersion: '2021-10-01'
type: Microsoft.ContainerInstance/containerGroups
location: eastus
properties:
osType: Linux
containers:
- name: swimm-onprem-agent
properties:
image: us-docker.pkg.dev/swimmio/public/onprem-agent:3
environmentVariables:
- name: CONFIG_PATH
value: /etc/swimm/onprem-agent.yaml
volumeMounts:
- name: config
mountPath: /etc/swimm
readOnly: true
ports:
- port: 24605
protocol: TCP
resources:
requests:
cpu: 1.0
memoryInGB: 1.5
readinessProbe:
initialDelaySeconds: 5
periodSeconds: 3
httpGet:
path: /health
port: 24605
volumes:
- name: config
secret:
onprem-agent.yaml: |
<base64-encoded-onprem-agent-config>
ipAddress:
type: Public
ports:
- protocol: tcp
port: 24605
dnsNameLabel: swimm-onprem-agent
autoGeneratedDomainNameLabelScope: TenantReuse
# If you want to persist logs to Azure Log Analytics, you need to fill in the workspace-id and workspace-key, otherwise remove this section
diagnostics:
logAnalytics:
workspaceId: <workspace-id>
workspaceKey: <workspace-key>
logType: ContainerInstanceLogsaz container create \
--resource-group <resource-group> \
--name swimm-onprem-agent \
--file swimm-onprem-agent.yaml -
To see the service URL, run:
az container show --resource-group <resource-group> --name swimm-onprem-agent --query ipAddress.fqdn --output tsv
If you didn't configure TLS using a fixed cert and key in the configuration (You will have to add the cert and key to the YAML to mount them to the container as well), you will also need to configure TLS termination using some other service in front of the container, for example Azure Front Door or Application Gateway.
This instructions are for a Bourne-like shell (e.g. Bash, Zsh), adapt them to your specific shell as needed.
You will need the Google Cloud SDK installed and authenticated.
# This used the default project, feel free to replace with a different one
PROJECT_ID=$(gcloud config get project)
# Feel free to pick a different region
REGION=us-central1

# A dedicated service account for the On-Prem Agent
gcloud iam service-accounts create swimm-onprem-agent \
  --display-name "Swimm's On-Prem Agent" \
  --description "Swimm's On-Prem Agent Service Account"

# The config secret
gcloud secrets create swimm-onprem-agent-config \
  --data-file=swimm-onprem-agent.yaml

# Add permissions to the service account to access the secret
gcloud secrets add-iam-policy-binding swimm-onprem-agent-config \
  --member=serviceAccount:swimm-onprem-agent@$PROJECT_ID.iam.gserviceaccount.com \
  --role=roles/secretmanager.secretAccessor

# Deploy the On-Prem Agent
gcloud run deploy swimm-onprem-agent \
  --image=us-docker.pkg.dev/swimmio/public/onprem-agent:3 \
  --no-invoker-iam-check \
  --region=$REGION \
  --service-account=swimm-onprem-agent@$PROJECT_ID.iam.gserviceaccount.com \
  --startup-probe=initialDelaySeconds=5,periodSeconds=3,timeoutSeconds=1,httpGet.port=8080,httpGet.path=/health \
  --set-env-vars=CONFIG_PATH=/etc/swimm/onprem-agent.yaml \
  --set-secrets=/etc/swimm/onprem-agent.yaml=swimm-onprem-agent-config:latest
To see the service URL, run:
gcloud run services describe --region=$REGION swimm-onprem-agent --format="get(status.url)"
Depending on your deployment method, you may need to configure a load balancer/reverse proxy for TLS/HTTPS, or mount your own certificate and private key to the container.
Step 4: Verify the Installation
In your browser on the client machines that are going to connect to the onprem-agent, browse to:
https://<your-service-url>/status
This should let you know if the service is up and running, and if the configuration is working correctly to communicate with your Azure OpenAI deployment.
You can also try from a terminal:
curl -v https://<your-service-url>/health
Step 5: Provide Service URLs to Swimm
Send the following service URL(s) to your contact at Swimm to complete the setup:
- On-prem agent service URL (the HTTPS URL where you deployed the On-Prem Agent)
- Git hosting server URL (GitHub Enterprise Server and GitLab Server only)
Once Swimm configures these URLs in your workspace, you'll be ready to start using the On-Prem Agent!
Setting Up a Budget Alert
The Azure Open AI token is not technically limited to a certain amount of API calls or budget, so it's better to have an alert for unusual/unauthorized usage.
Here is a short video that shows how to do that:
1.2 SCIM with Microsoft Entra Setup
SCIM (System for Cross-domain Identity Management) provisioning with Microsoft Entra ID enables automatic user and group synchronization to your Swimm workspace.
Prerequisites
Before setting up SCIM, ensure you have:
- Admin access to your Microsoft Entra ID tenant
- Admin access to your Swimm workspace
- The SCIM tenant URL and secret token provided by Swimm
Setup Steps
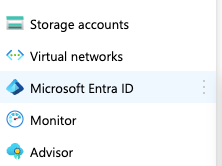
Step 1: Navigate to Microsoft Entra ID
In the Azure portal, go to Microsoft Entra ID from the main navigation menu.
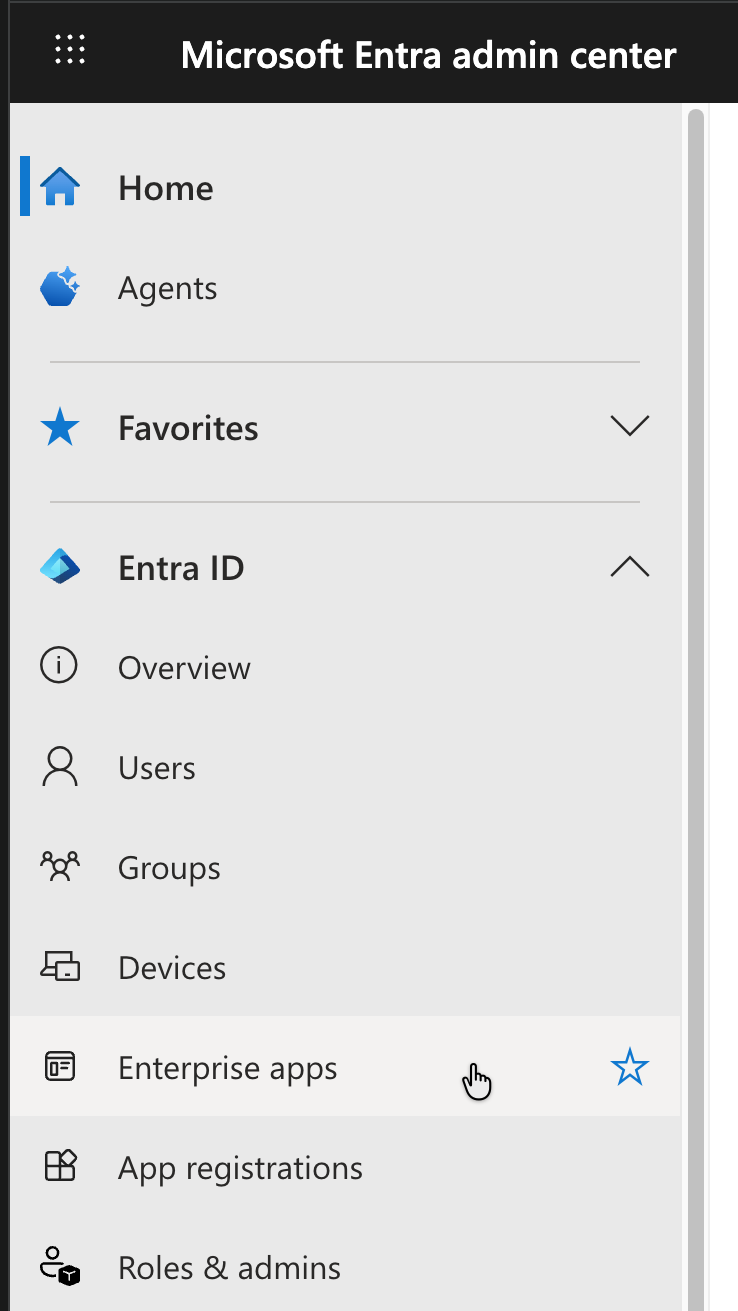
Step 2: Access Enterprise Applications
From the Microsoft Entra ID overview page, navigate to Enterprise applications under the Manage section.
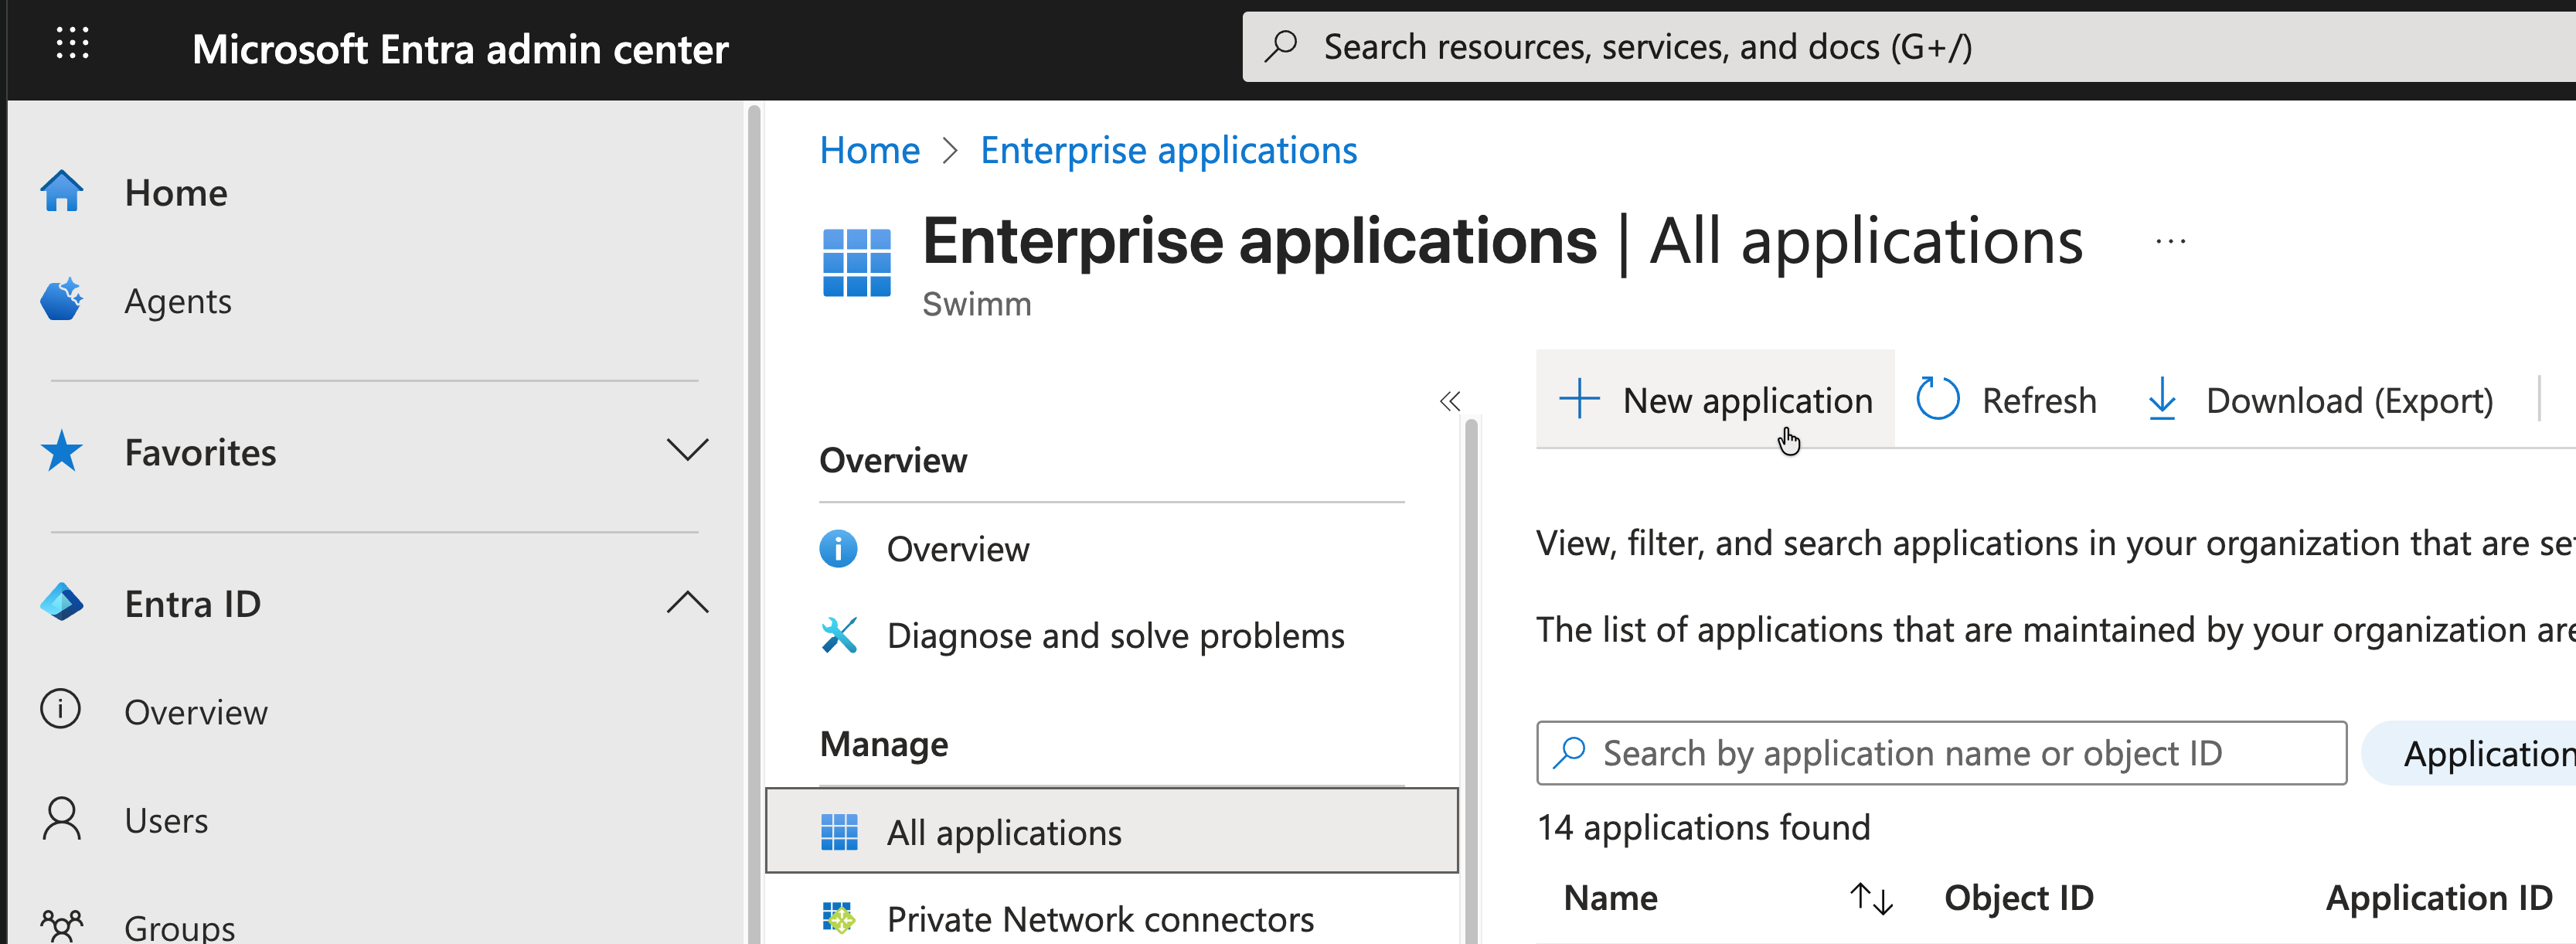
Step 3: Create a New Enterprise Application
Click New application to create a new enterprise application for Swimm SCIM integration.
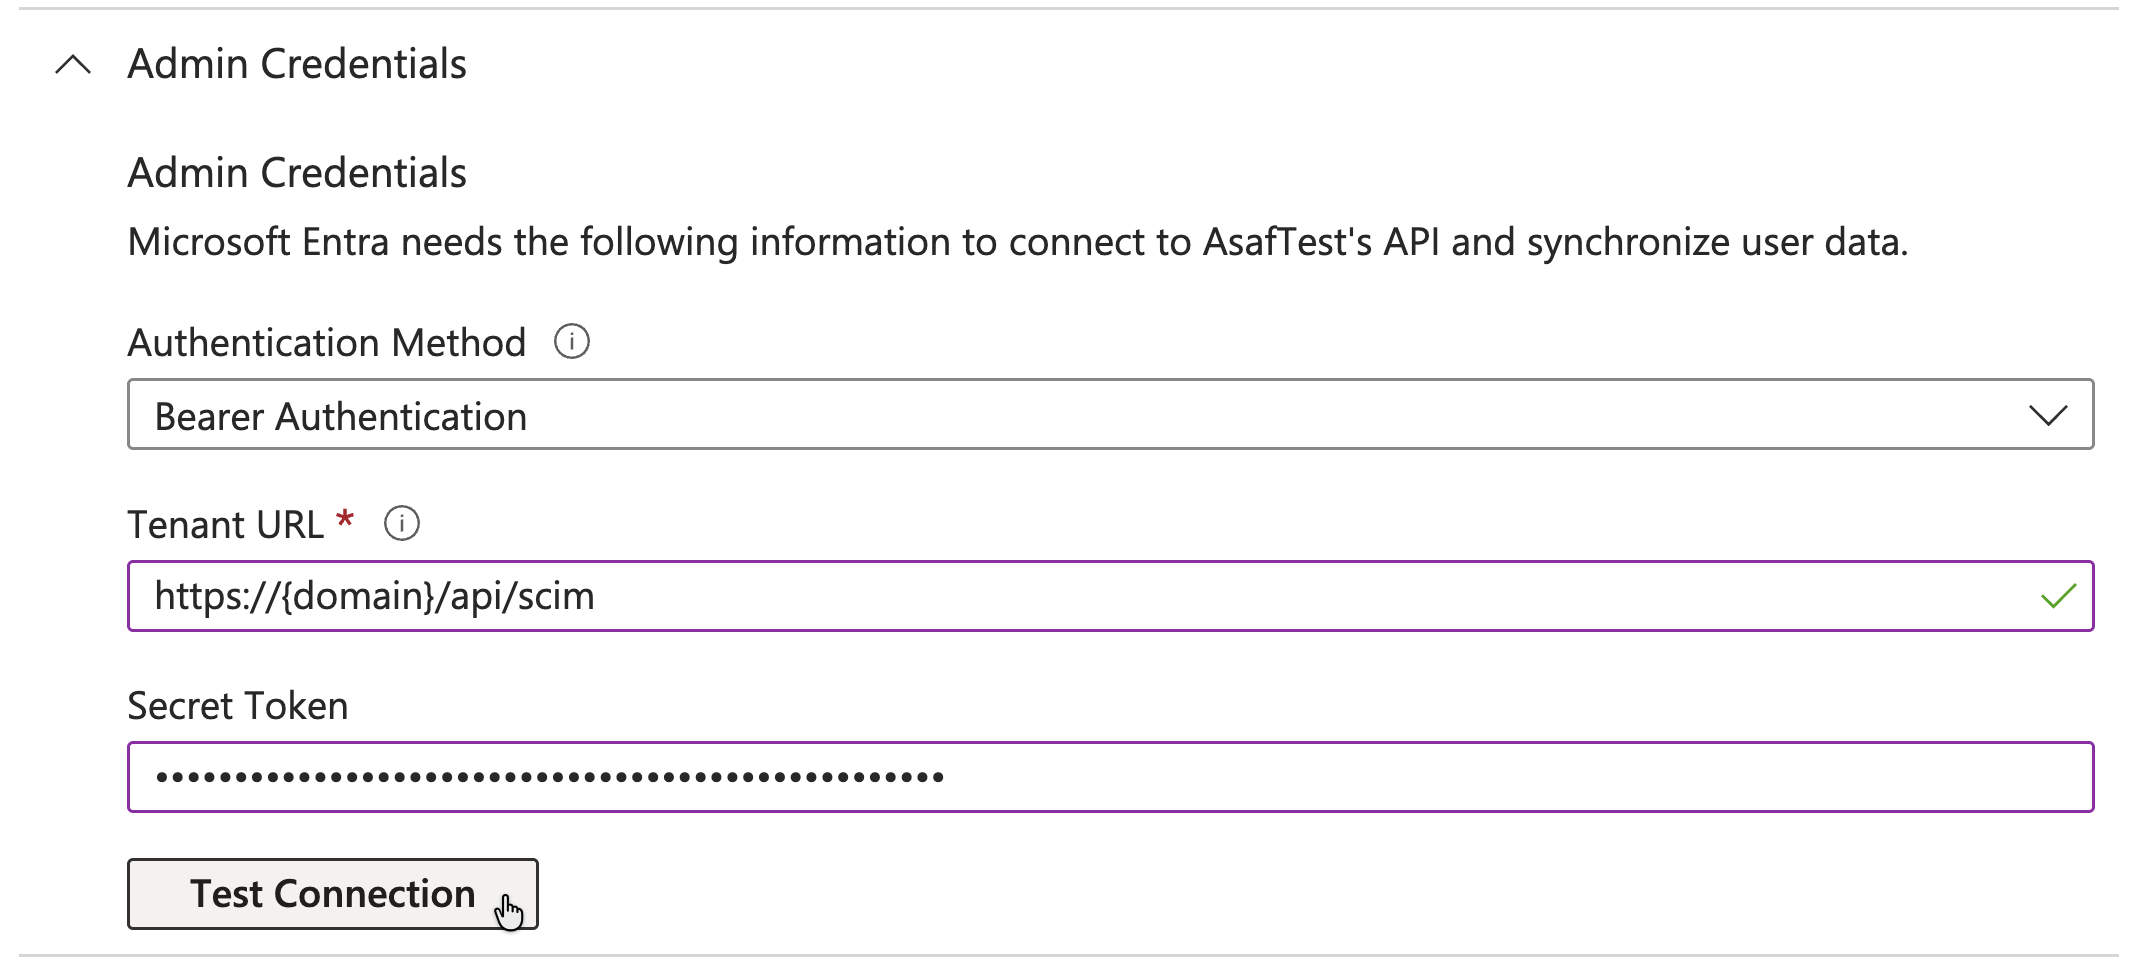
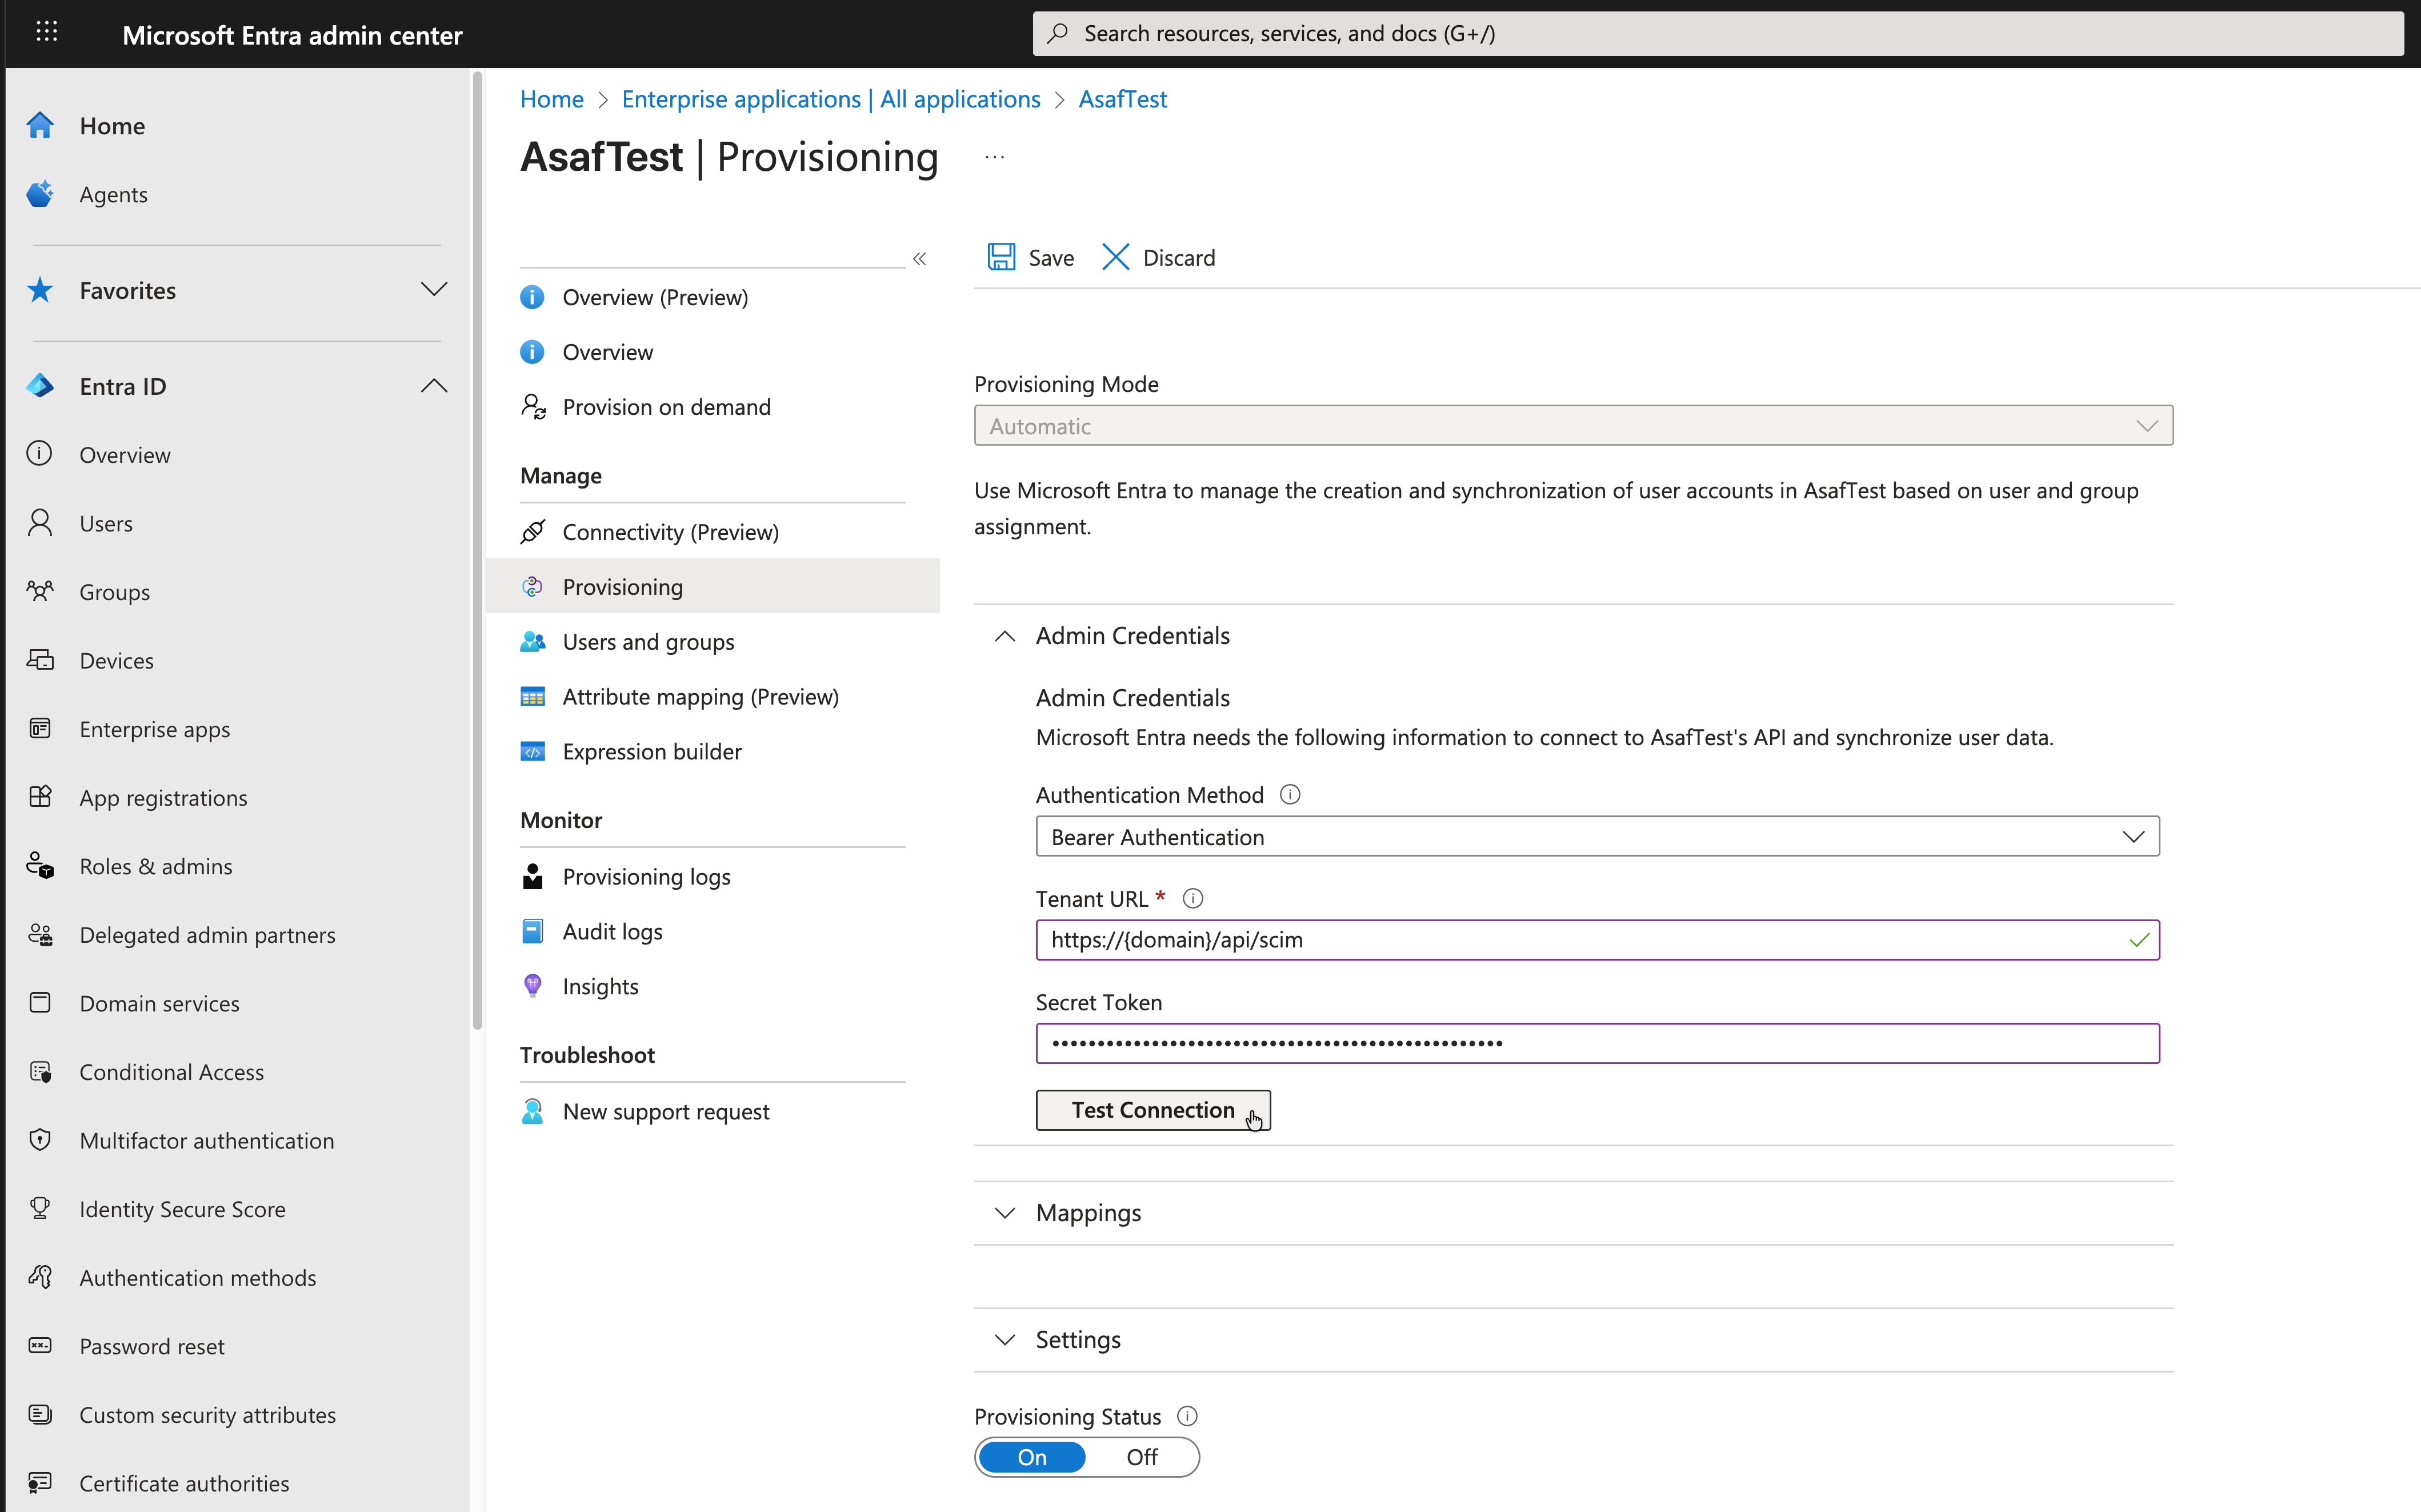
Step 4: Configure Provisioning Settings
Navigate to the Provisioning section of your newly created application and enter:
- Tenant URL:
https://mycompany-swimm.io/api/scim - Secret Token: The token provided by your Swimm workspace administrator
Click Test Connection to verify the configuration.
Step 5: Enable Provisioning
Once the test connection is successful:
- Set Provisioning Mode to Automatic
- Configure your Mappings and Settings as needed
- Set Provisioning Status to On
- Click Save to apply changes
Next Steps
After enabling provisioning:
- Users and groups assigned to this enterprise application will be automatically provisioned to your Swimm workspace
- User lifecycle changes (additions, updates, deactivations) will be automatically synchronized
- Monitor provisioning activity in the Provisioning logs section
Troubleshooting SCIM
If you encounter issues:
- Verify the tenant URL and secret token are correct
- Check that the enterprise application is assigned to appropriate users and groups
- Review provisioning logs for detailed error messages
- Ensure your Swimm workspace has SCIM provisioning enabled
Part 2: Getting Started (For All Users)
Once your administrator has completed the workspace setup, you can start using Swimm.
2.1 Create Your Swimm Account
To get started with Swimm, create a user account under your organization's workspace. Once you've created an account and logged in, you'll notice that your admin may have added repositories to the workspace for your organization's git hosting provider.
Note: If you don't see the repositories you'd like to use with Swimm, reach out to the admin to add them to your workspace.
Once you have access to the repository you'd like to use, you can start creating Swimm docs.
2.2 Install the Swimm IDE Plugin
Download the Swimm plugin for your favorite IDE to access Swimm docs directly from your code editor. Go to your extension marketplace and search for "Swimm", or use the links below:
| VS Code | JetBrains |
|---|---|
| Download Plugin | Download Plugin |
Having trouble? Check out our IDE troubleshooting guide for more information.
Part 3: Using Swimm (For All Users)
3.1 Why Use Swimm?
Traditional documentation solutions are often difficult to maintain, and engineers spread content across multiple tools, making it difficult to find and trust information when code changes regularly.
Swimm is designed to make it easy to create, maintain, and share documentation with your team. Swimm Docs are markdown files that contain your documentation content and are stored in a git repository.
3.2 Working with Documentation
Create and Edit Documents
To create a new Swimm doc, click on the Document button in the IDE plugin. This will open a new markdown file in your IDE within the .swm directory.

- If you do not have any Swimm documents in your repository, the plugin will create the
.swmdirectory for you. - If you
git pulla repository with Swimm docs, the plugin will recognize the existing.swmdirectory and display the docs in the plugin.
Give Your Document a Title
Start by giving your document a title. Our recommendation is to be as descriptive as possible - How to post analytics is a better title than Analytics, as the former tells the reader what they will learn from reading the doc.
Add Content to Your Document
Write with Markdown to add content to your Swimm doc. We encourage writers to take advantage of our Editor commands to make writing easier and code-couple your documentation to your codebase.
Any time you link code to your documentation, Swimm will automatically update the code snippets in your docs when the code changes. This ensures that your documentation is always up-to-date.
1. Type /Code snippet and press enter
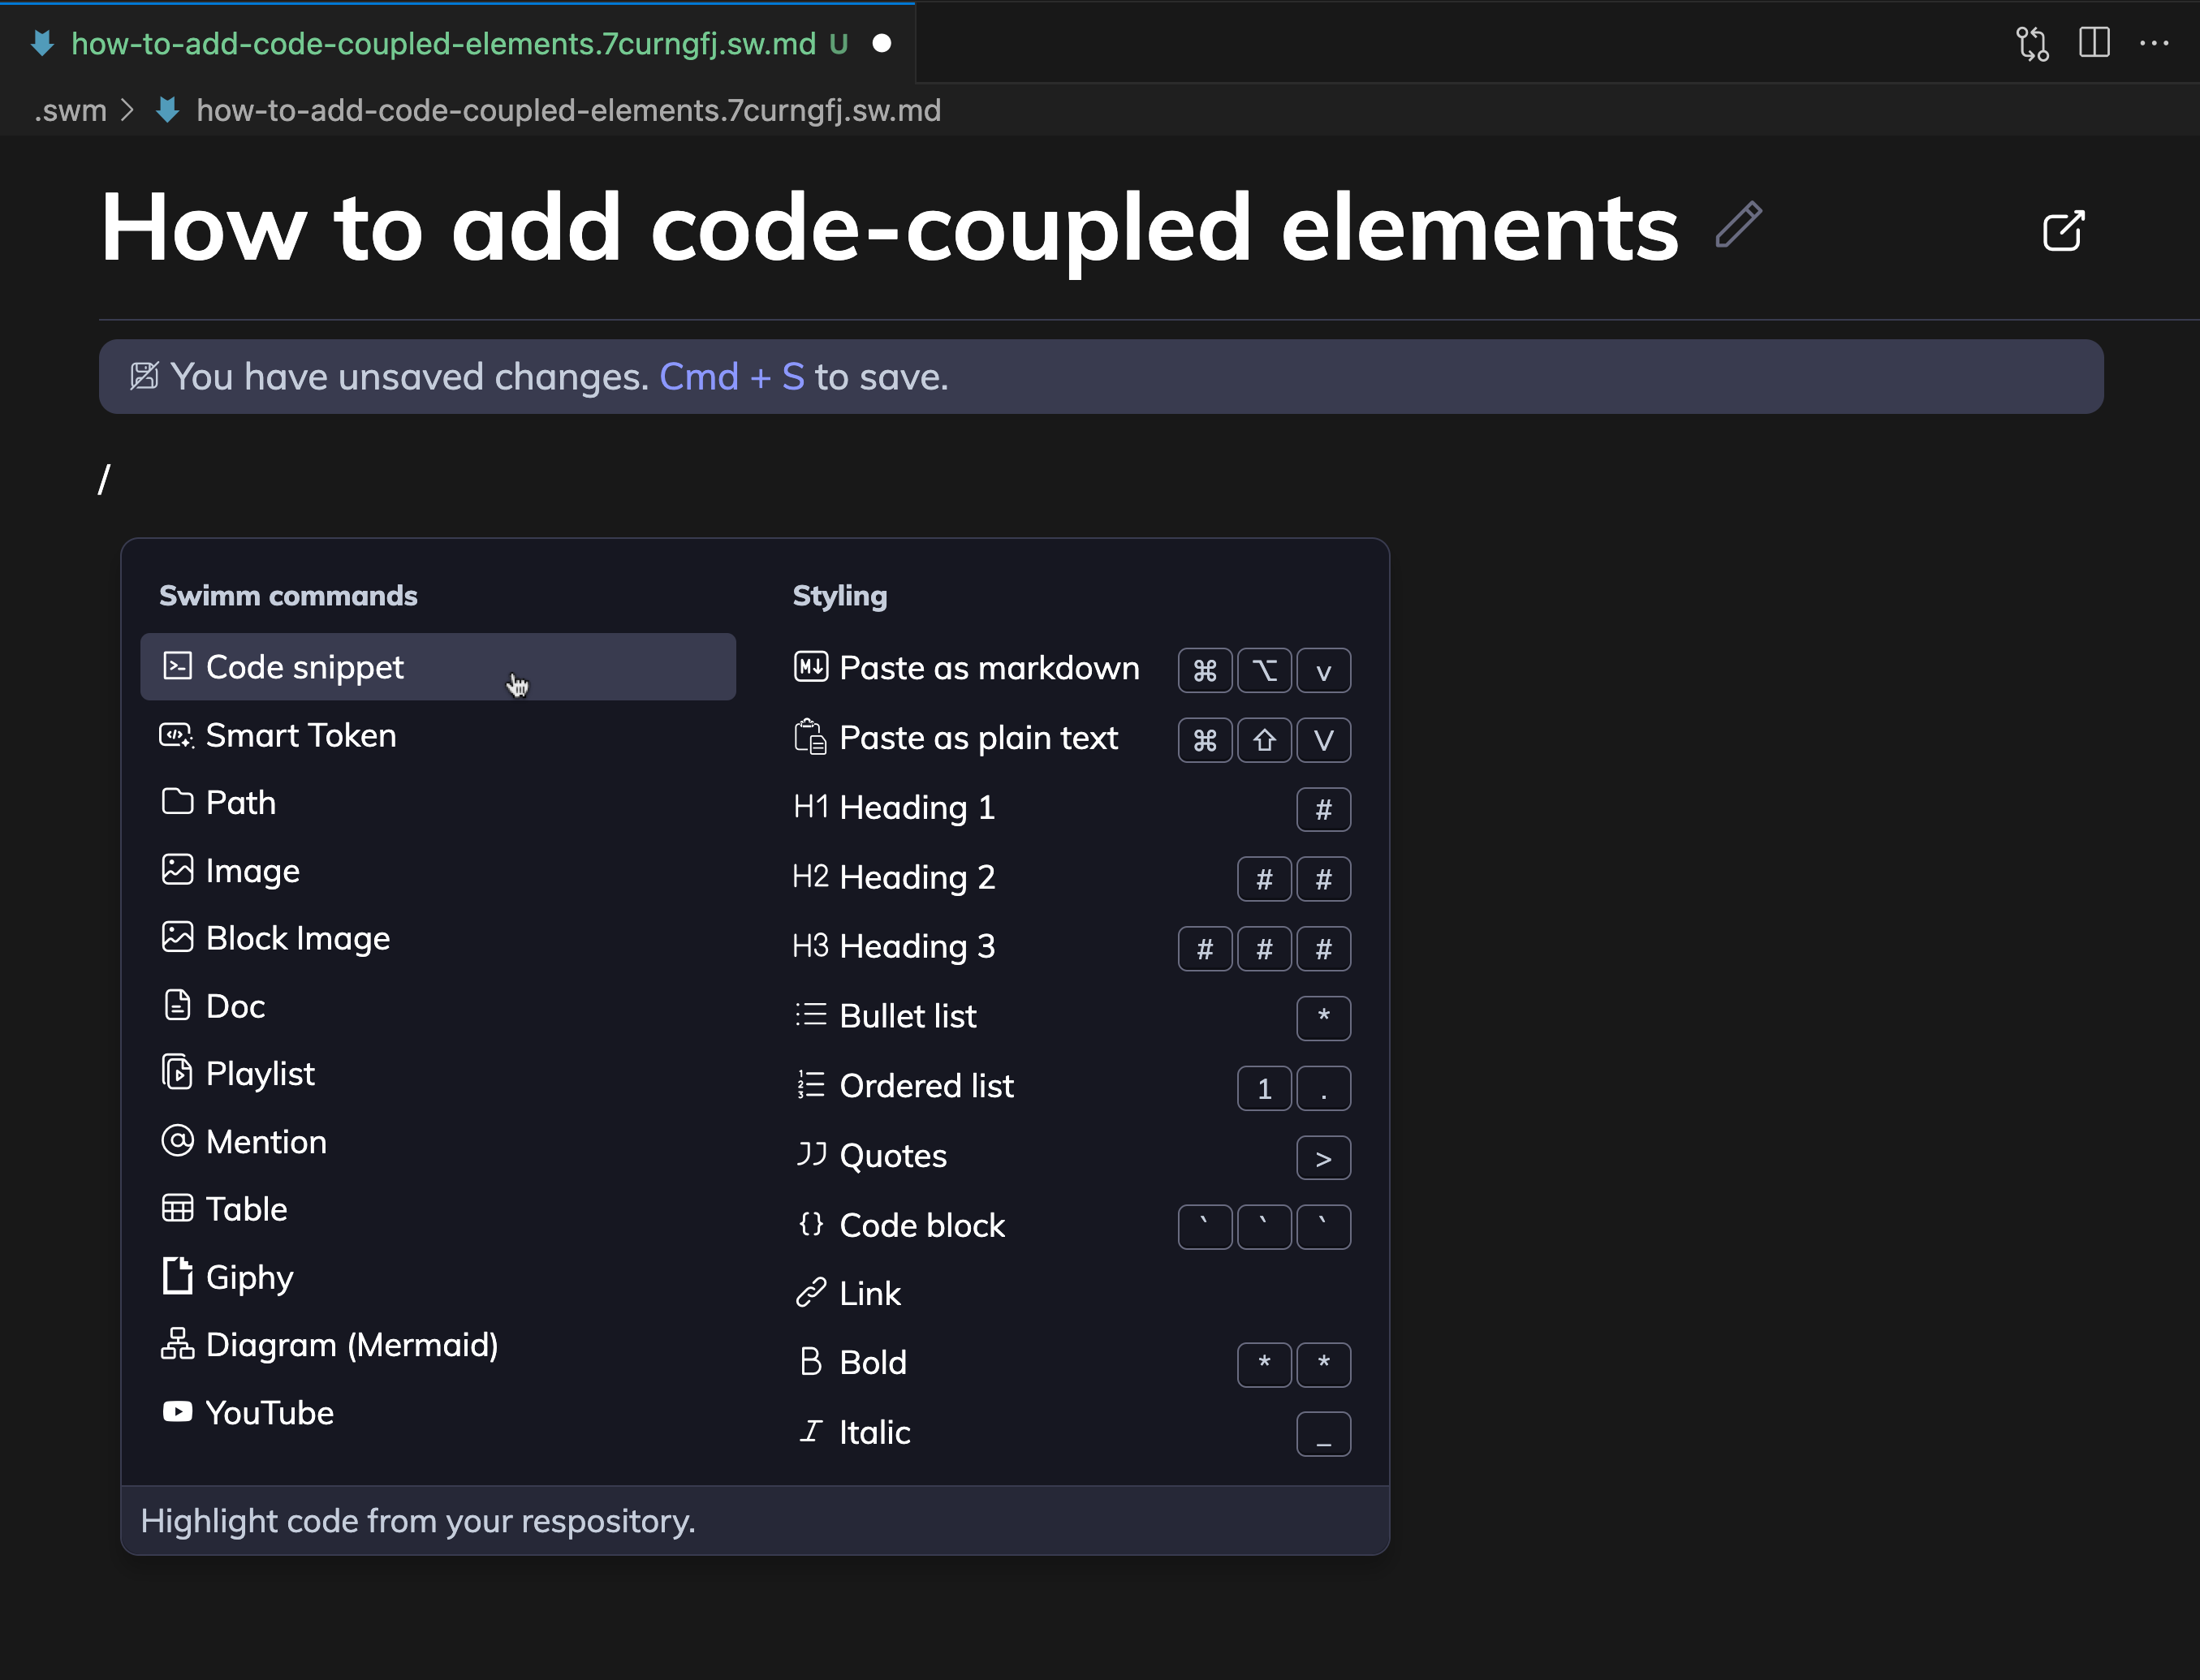
2. Select snippet from codebase and click Add to Doc
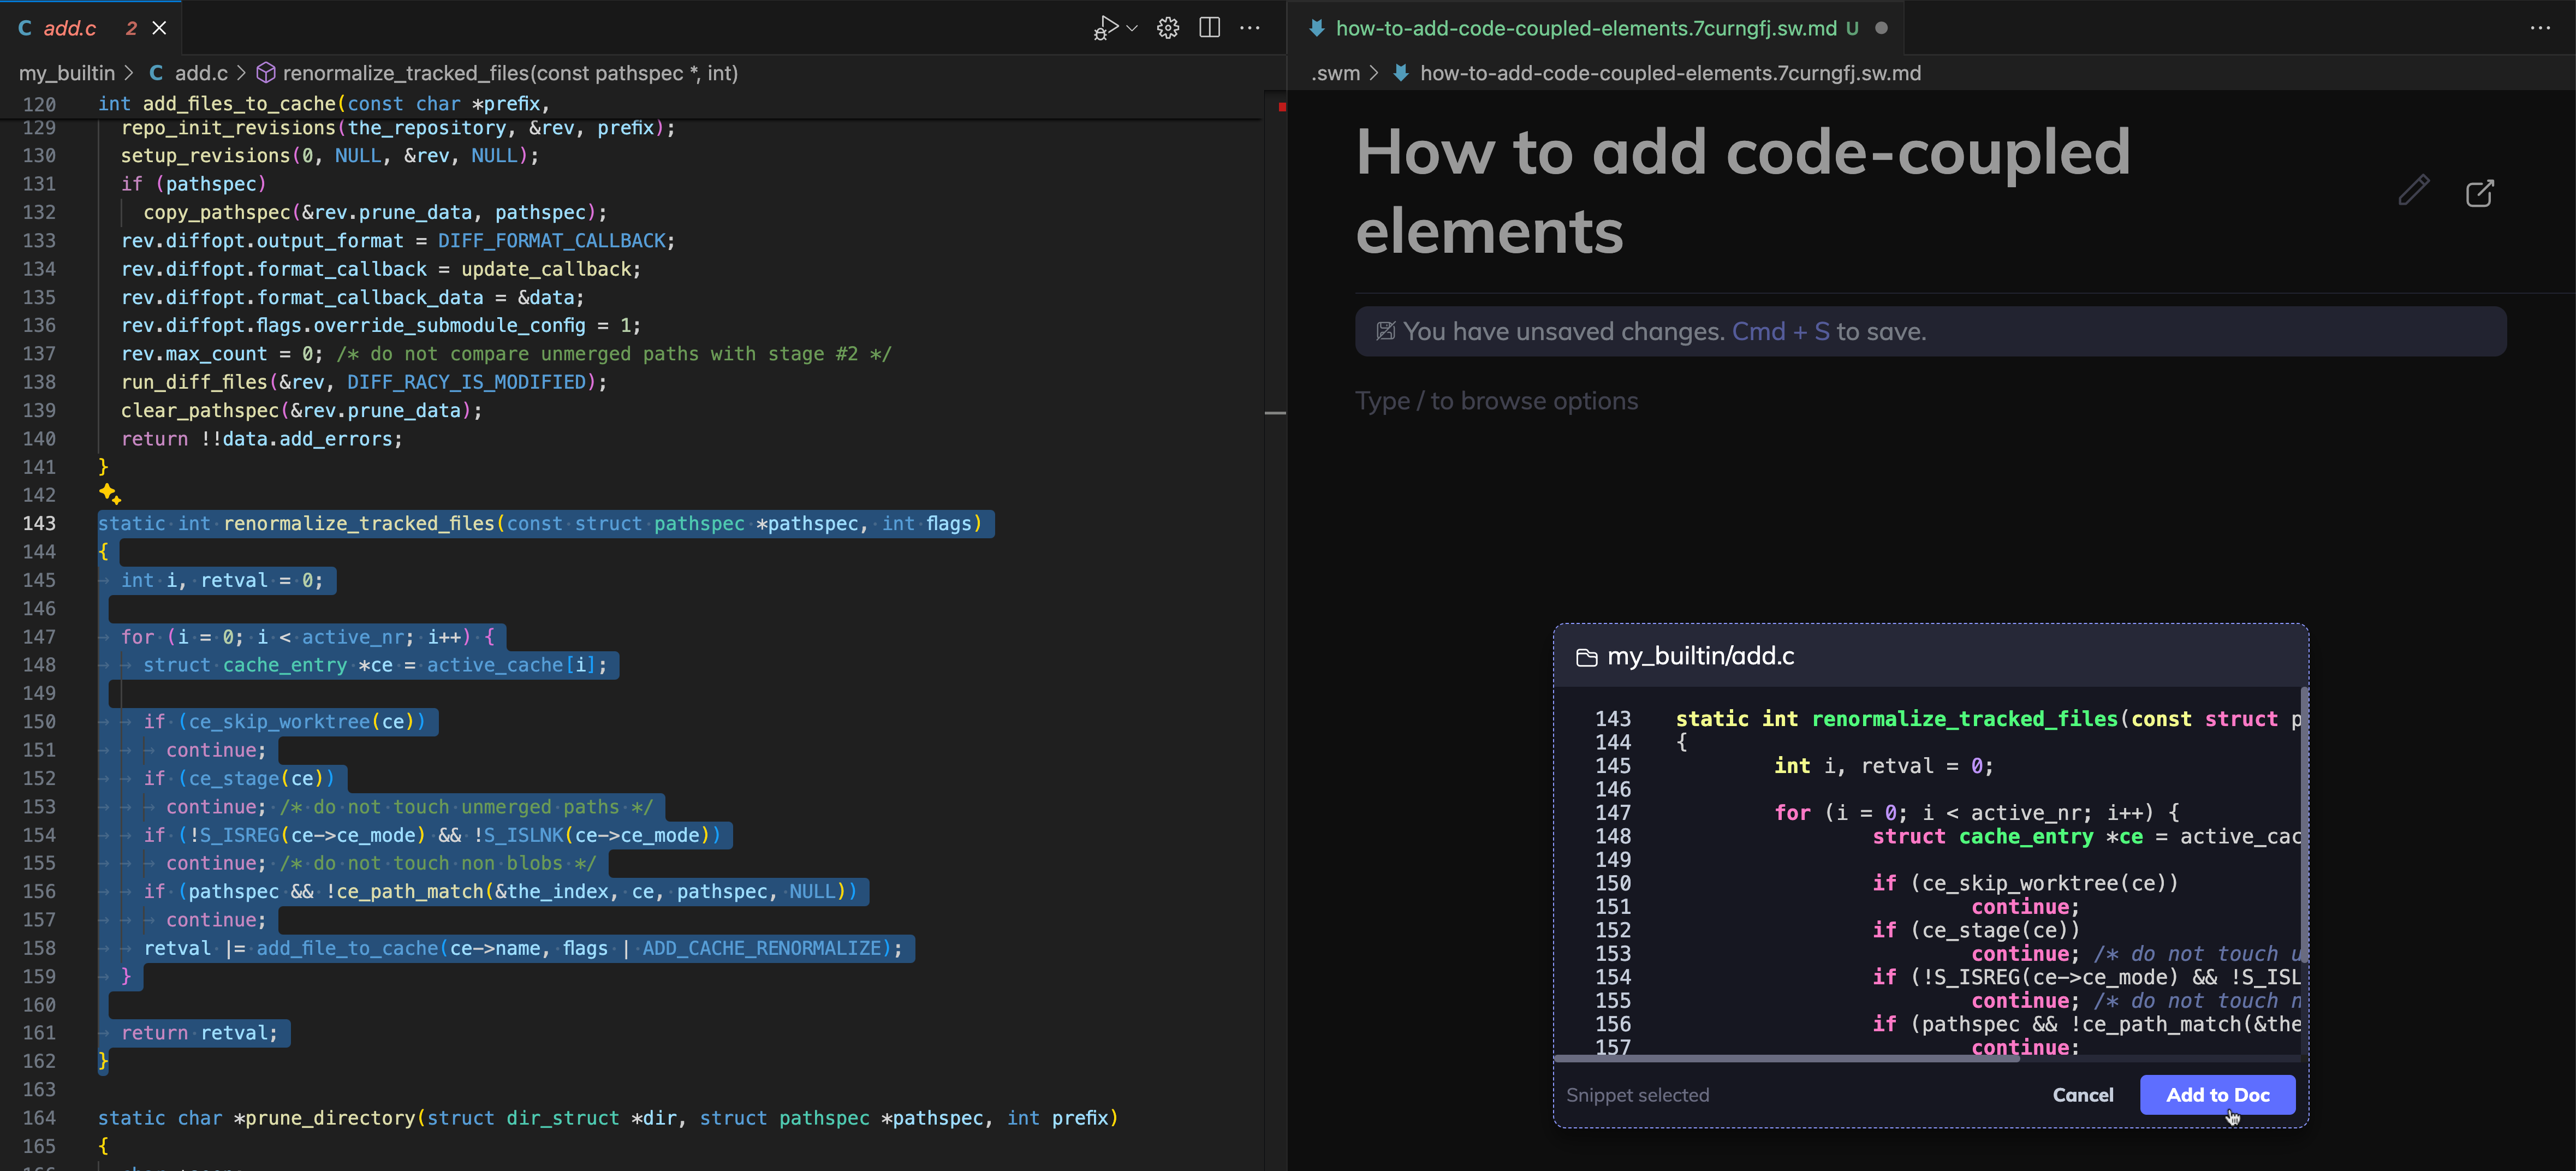
3: Save Swimm doc
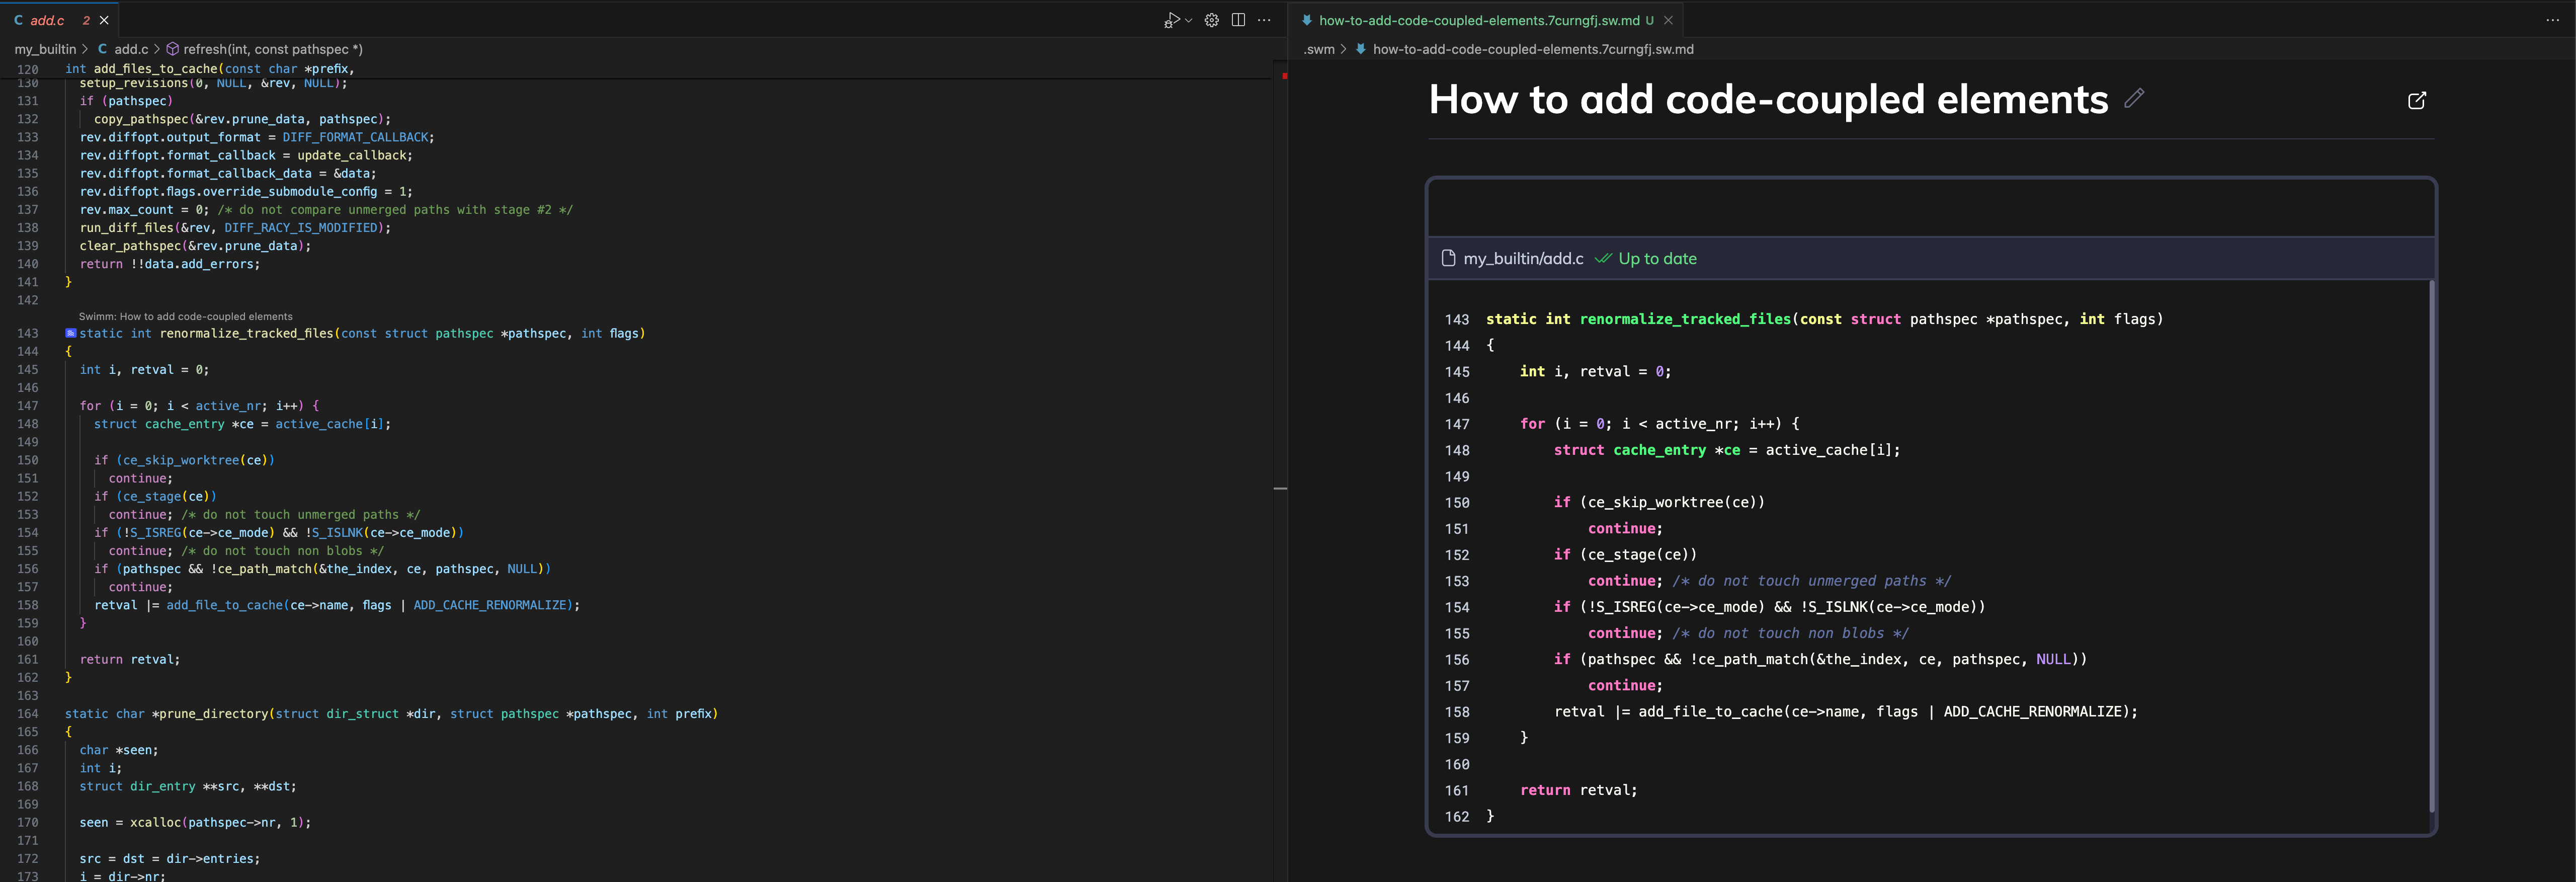 Note the blue icon in the gutter that indicates a code snippet is linked to this doc.
Here is a list of important Swimm commands:
| Command | Description |
|---|---|
/Code snippet | Add live code to your document with code snippets. |
/Smart Token | Link to a specific token from your code, like a function name, variable or specific value. |
/Path | Add a path of a directory or a file in your document. Swimm will track it in case it is renamed, moved, or deleted. |
/Image | Add an image to your document, stored in your repository (default) or Swimm's cloud servers. |
/Doc | Add a link to an existing Swimm doc. Swimm will track it in case it gets out of date and notify. |
/Playlist | Add a link to an existing Playlist. Swimm will track it and notify you if it’s out of date. |
/Diagram | Add a code-coupled diagram. |
/AI or /Generate description | Generate a description for the snippet with Generative AI. |
Discoverability of Docs
Swimm makes it easy to find documentation in your IDE in two ways:
1. Plugin Search
The search bar is located at the top of the plugin.
2. Code Snippet Waves 🌊
Swimm makes it easy for documentation to find you. When you're in a file that references a code snippet in a Swimm doc, hover over the blue icon in the gutter to see an option to open the documentation.

Auto-sync and Doc Maintenance
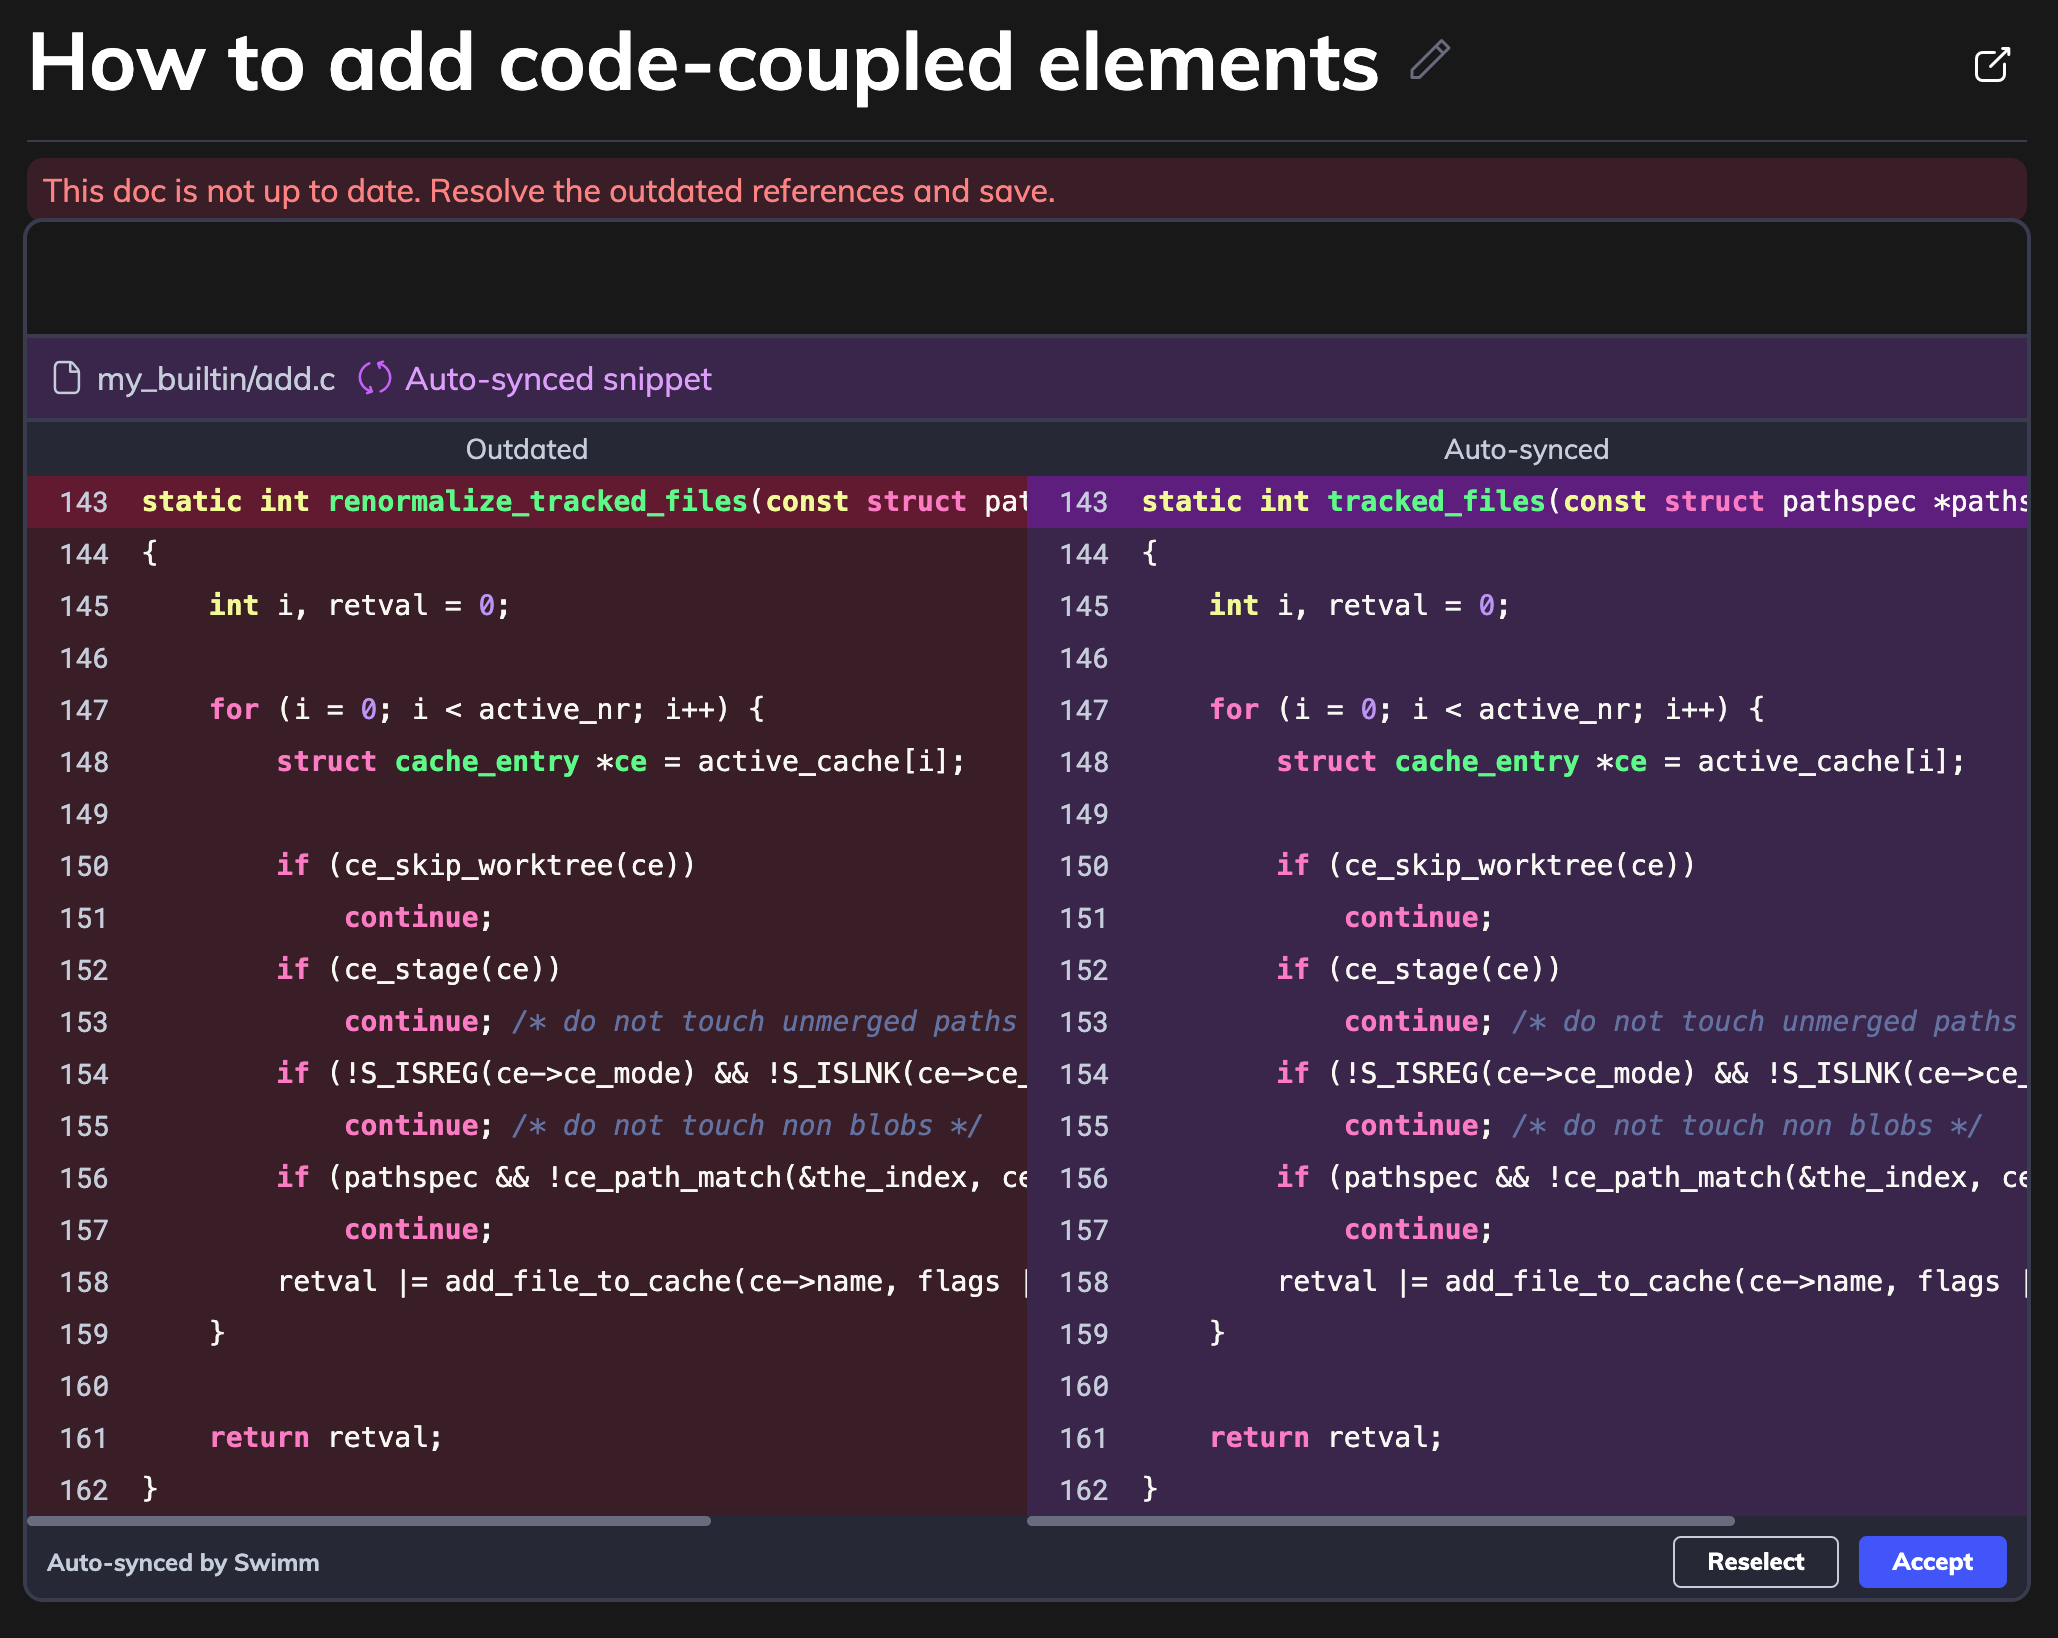
When you make changes to your code, Swimm will notify you that code snippets in your docs are out of date.
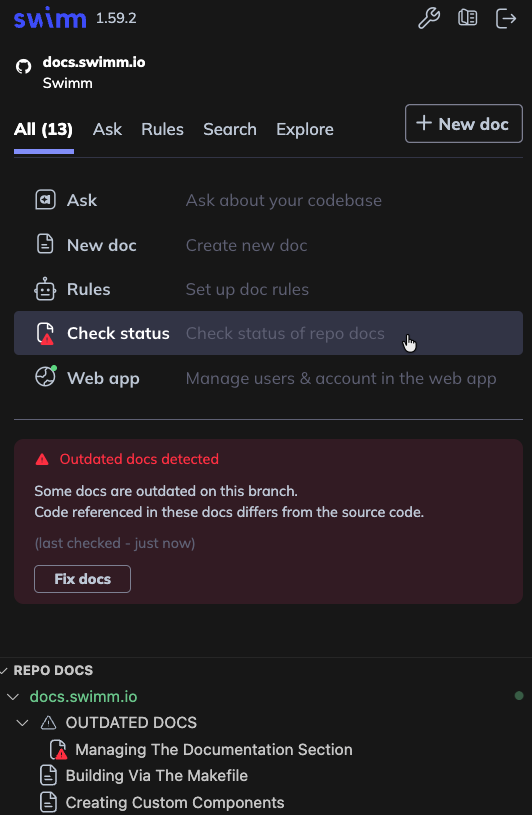
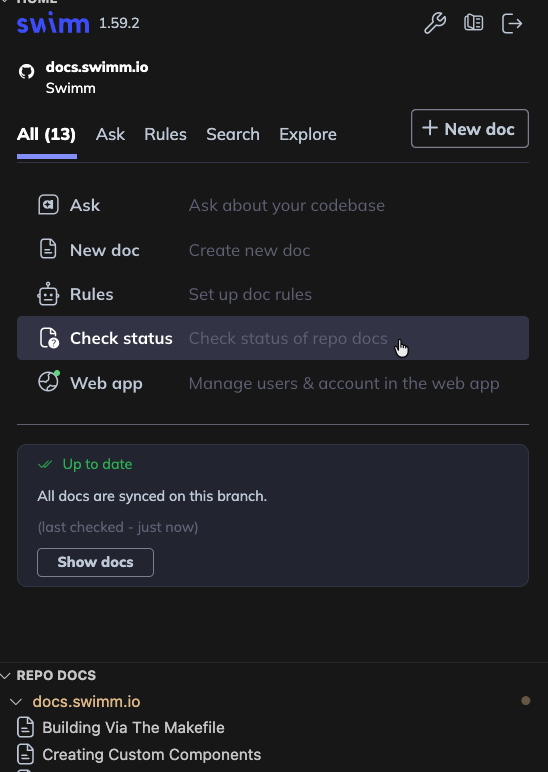
1. Click Status to Verify Your Documents
If your code has changed and you haven't updated your Swimm docs, you'll see "⚠️ Review required" status. Click on the affected doc(s) to update outdated code-coupled elements.
2. Open Your Affected Document, Reconcile Changes and Save
3. Verify Docs Are Up-to-Date and Commit to Repository
3.3 Codebase Explanations
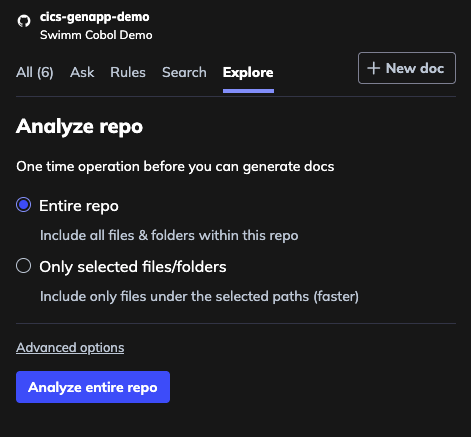
Swimm Explore helps you understand unfamiliar code by analyzing your repository structure, discovering modules and components, and using AI to generate comprehensive artifacts based on that analysis.
Step 1: Analyze Your Repository
In your Swimm IDE plugin, click on the Analyze Repo button to start the exploration process. Swimm will begin analyzing your codebase structure.
Step 2: Discovering Modules
Swimm will automatically scan through your repository using static analysis to discover modules, components, and key areas of your codebase.
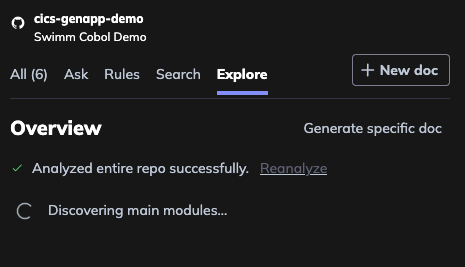
Step 3: Analysis Complete
Once the analysis is complete, you'll see a confirmation that your repository has been successfully analyzed.

Step 4: View Discovered Modules
Browse through the modules and components that Swimm has discovered in your codebase. Each module represents a logical grouping of functionality.

Step 5: Expand a Module
Click on any module to expand it and see the details, files, components, and the call tree showing where it's used within your codebase.
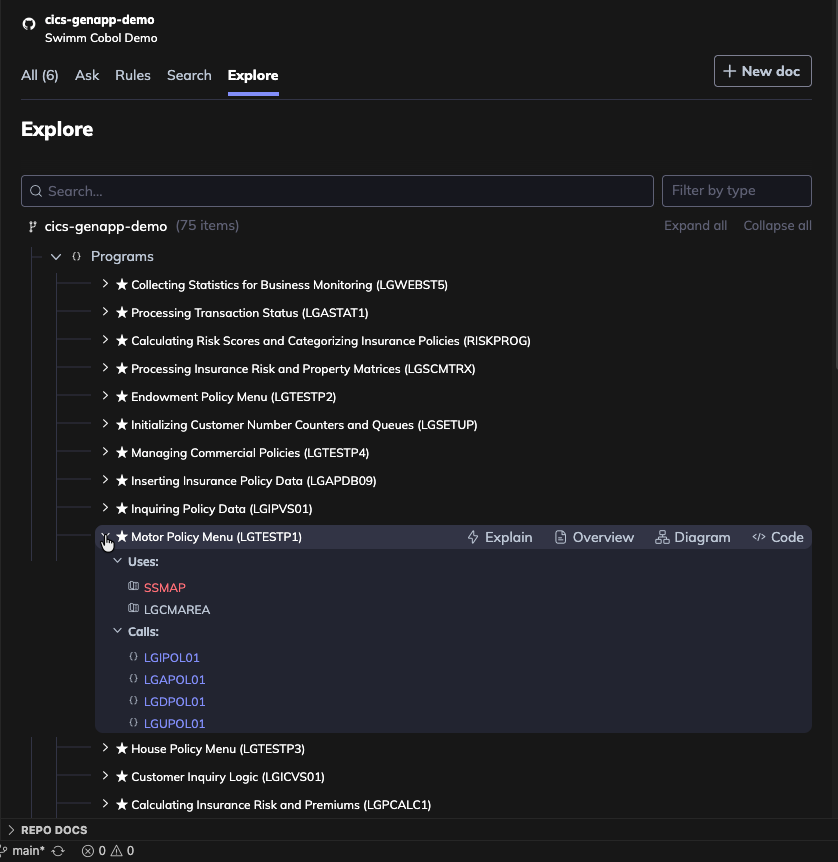
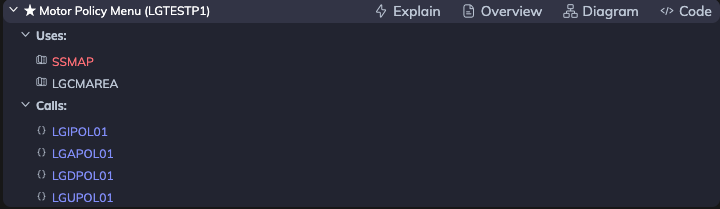
Step 6: Module Actions
Each module provides several options to help you understand and document the code:
| Action | Description |
|---|---|
| Explain | AI generates a thorough explanation based on static analysis of the program, including module flow, functionality, dependencies, and code complexity. Includes an overview diagram, technical explanations, and extracted business rules. |
| Overview | AI generates a brief explanation of the functionality based on the static analysis. |
| Diagram | Creates a code-coupled dependencies diagram based on the static analysis of the module. |
| Code | Opens the relevant code file for the module. |
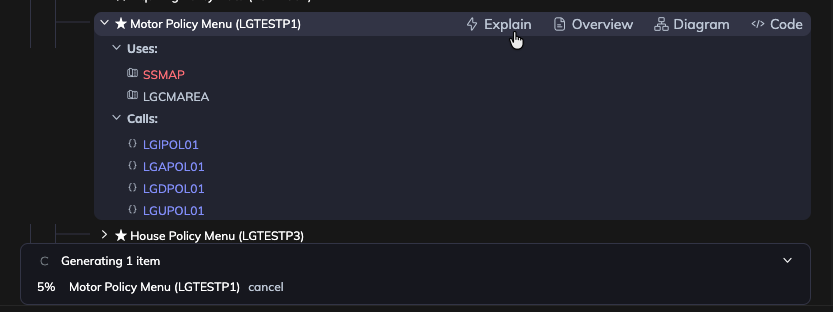
Step 7: Generate Module Explanation
Select the Explain option. AI will process Swimm's static analysis to generate a comprehensive explanation for the module.
Step 8: Explore and Save Documentation
Review the generated documentation which includes technical explanations, business rules, code-coupled diagrams, and flow documentation. You can edit, refine, and save it as a Swimm doc for your team to use.
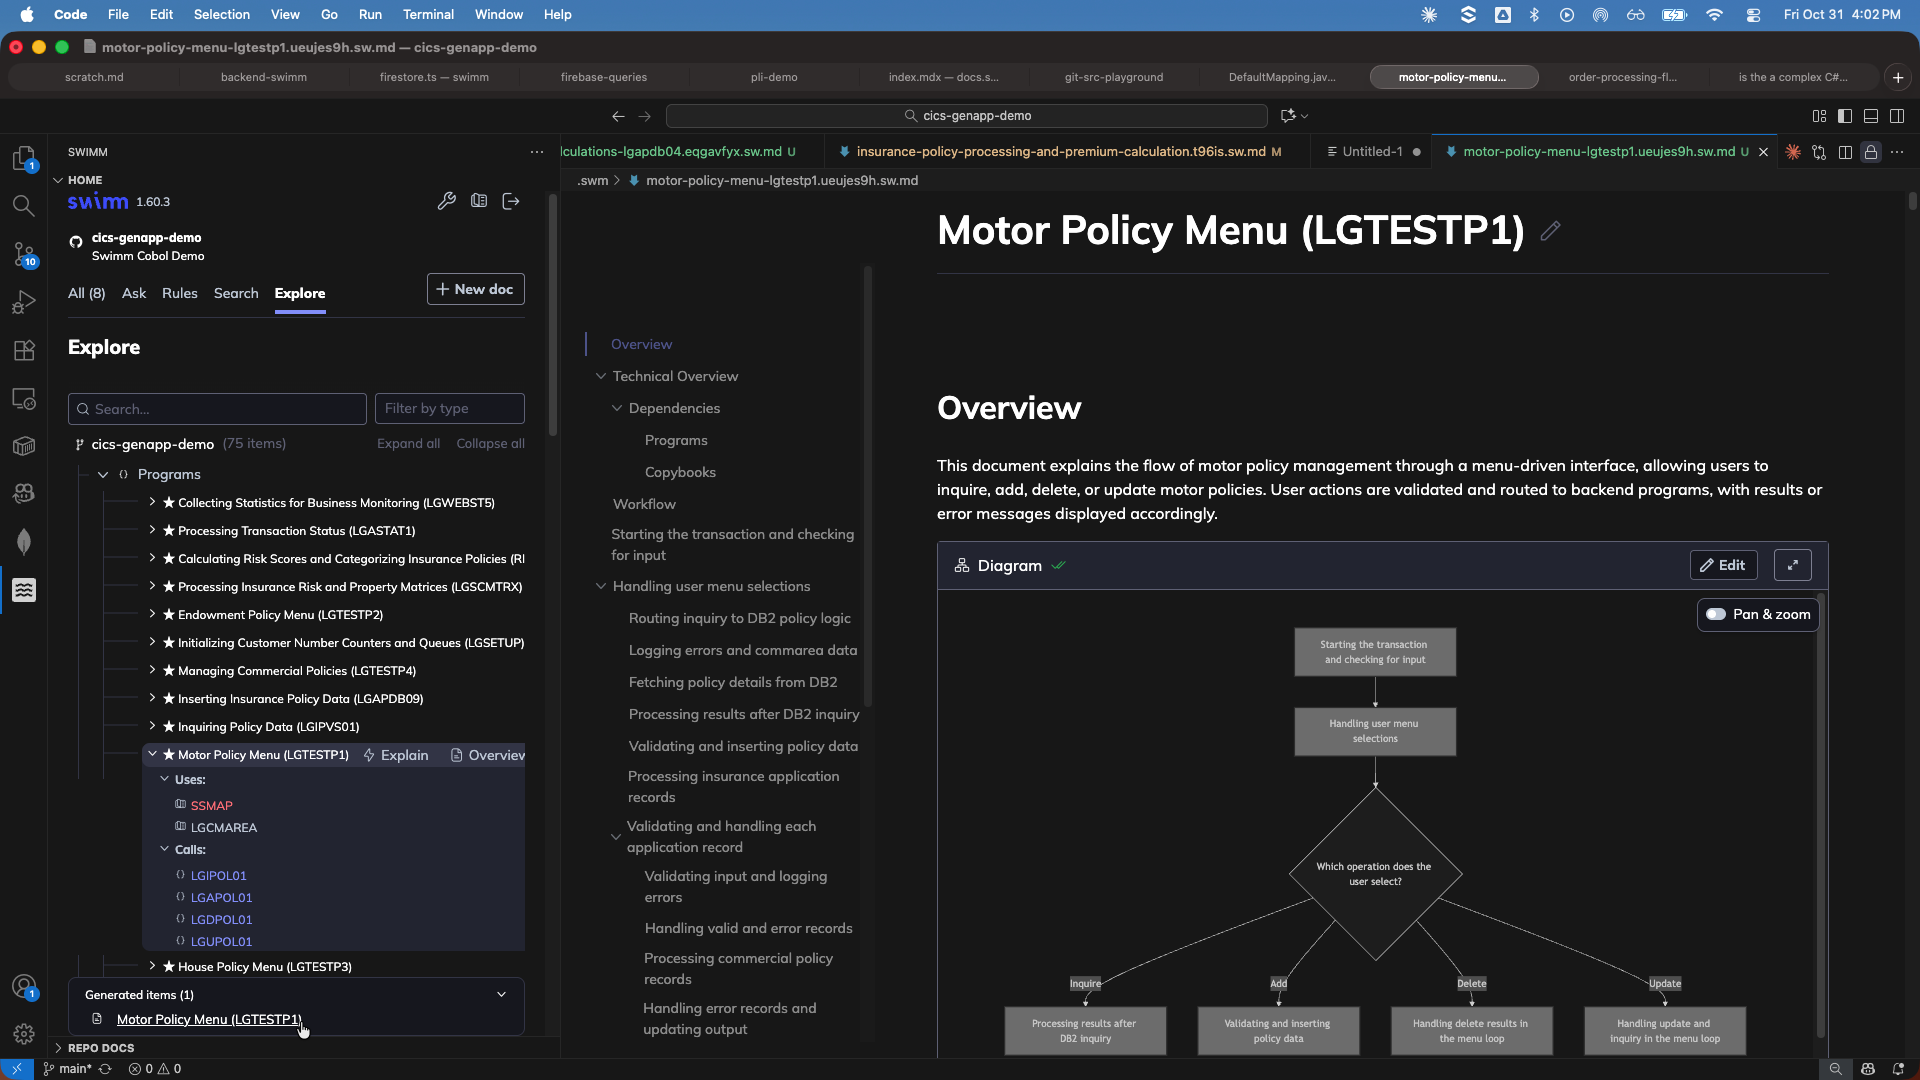
Module Explanation Flow
See the entire module explanation workflow in action:
3.4 Advanced Features
Doc Rules
Doc rules are a way to enforce documentation standards across your organization. You can create rules that surface knowledge to your fellow engineers as they type inside files within the IDE.
Swimm's Rules feature links your codebase to relevant information using Regex rules.
When a rule is triggered, a notification in the form of blue waves that underline the code will appear as you finish typing, prompting the user to hover and read the relevant information and linked Swimm doc, if attached.
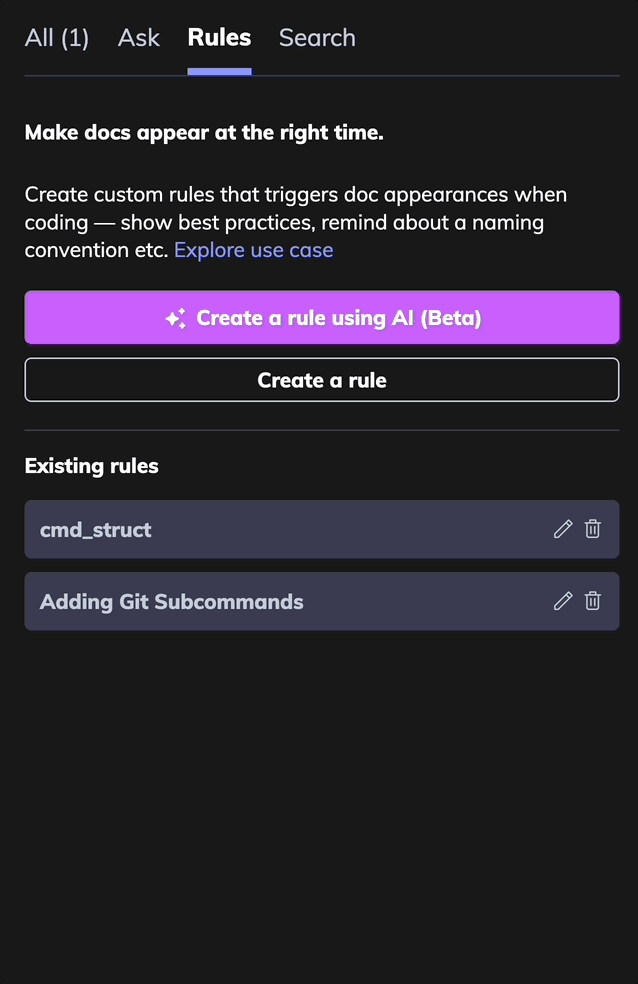
Creating Rules
-
Create a new rule: In your IDE, open Swimm's plugin. Here, you'll find the
Rulesbutton. Click on it to start creating a new rule. -
Choose the relevant Swimm document (Optional): This document will be linked with your regex rule and will be displayed whenever the rule's conditions are met in the code.
-
Enter rule details:
- Title - will be shown in the
Rulesview to identify this rule. - Description - will be shown when the user hovers over the marked code.
- Restrict rules to paths or types - you can restrict the rule to match only to specific paths or file types.
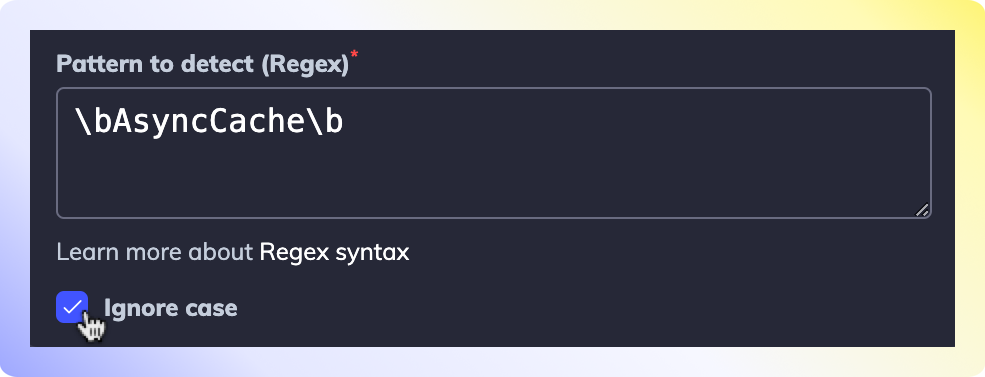
- Regex - the regex that should be met for the rule to apply.
- Title - will be shown in the
(Optional) Case-Insensitive Rules
If you want your rule to be case-insensitive, click on the Ignore case checkbox.
Save, Test and Commit
-
Save and test: Click
Apply, and you will be able to see the highlighting in your code. We recommend testing in your IDE to see that the rule works the way you expect. Open a file and type to match the Regex pattern you defined. You should see the Rule match with the text you typed. If it doesn't, you may need to adjust the Regex pattern. -
Commit: Rules are stored in your code under the
.swm/rules.jsonfile. Commit and push your changes to this file. Once your colleagues pull the latest version which includes your changes, everyone will share the same rules.
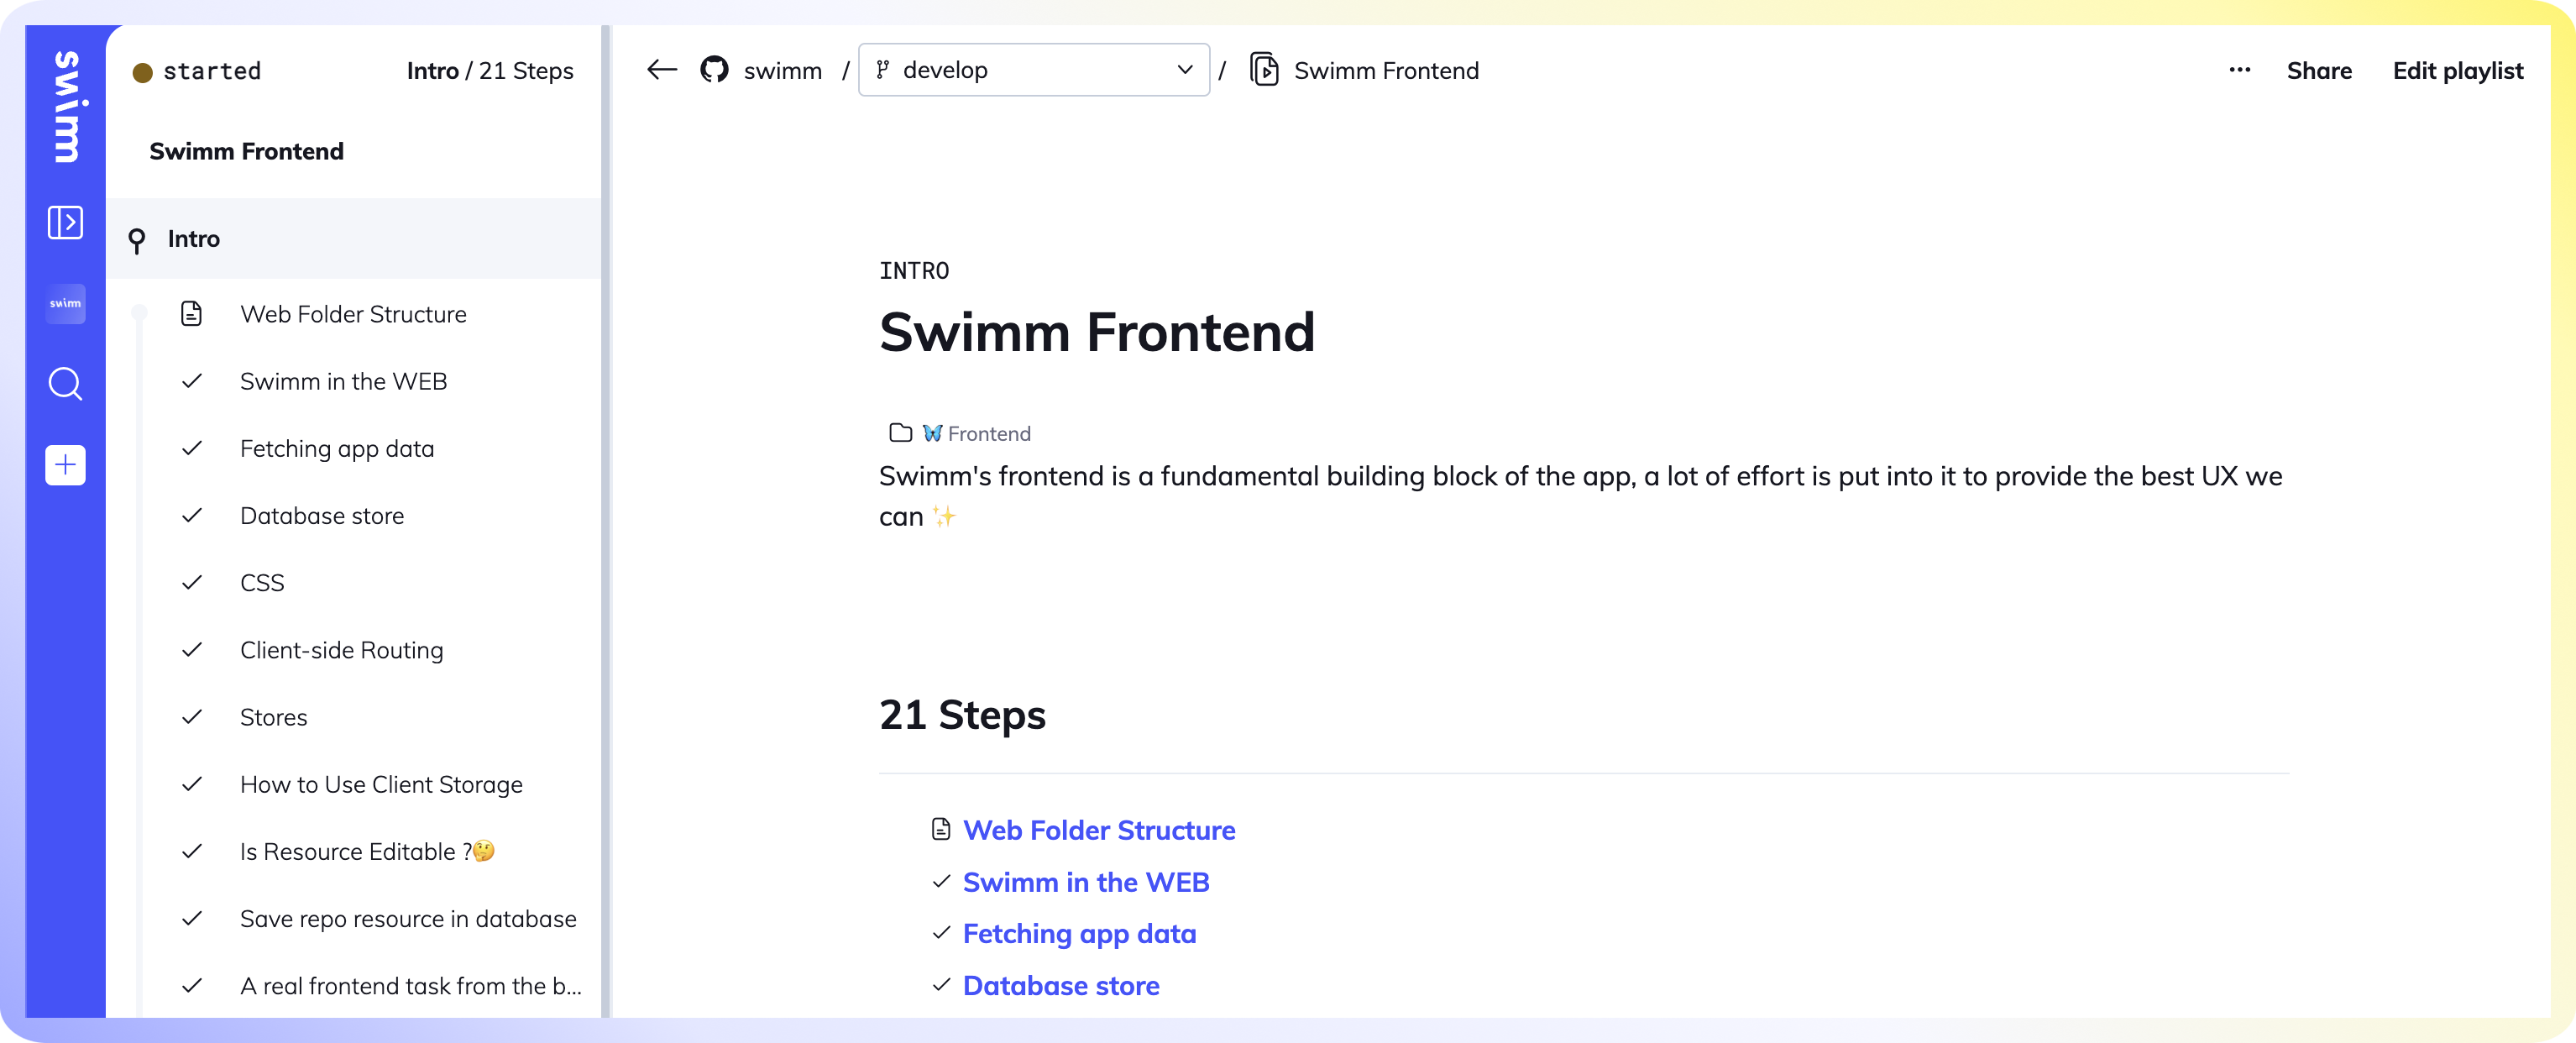
Playlists (Swimm Web App)
Playlists are a way to group related Swimm docs and external resources together. You can create a playlist for a specific feature, project, or team, and share it with your team.
Create a Playlist
1. Select your repository and Create your Playlist.
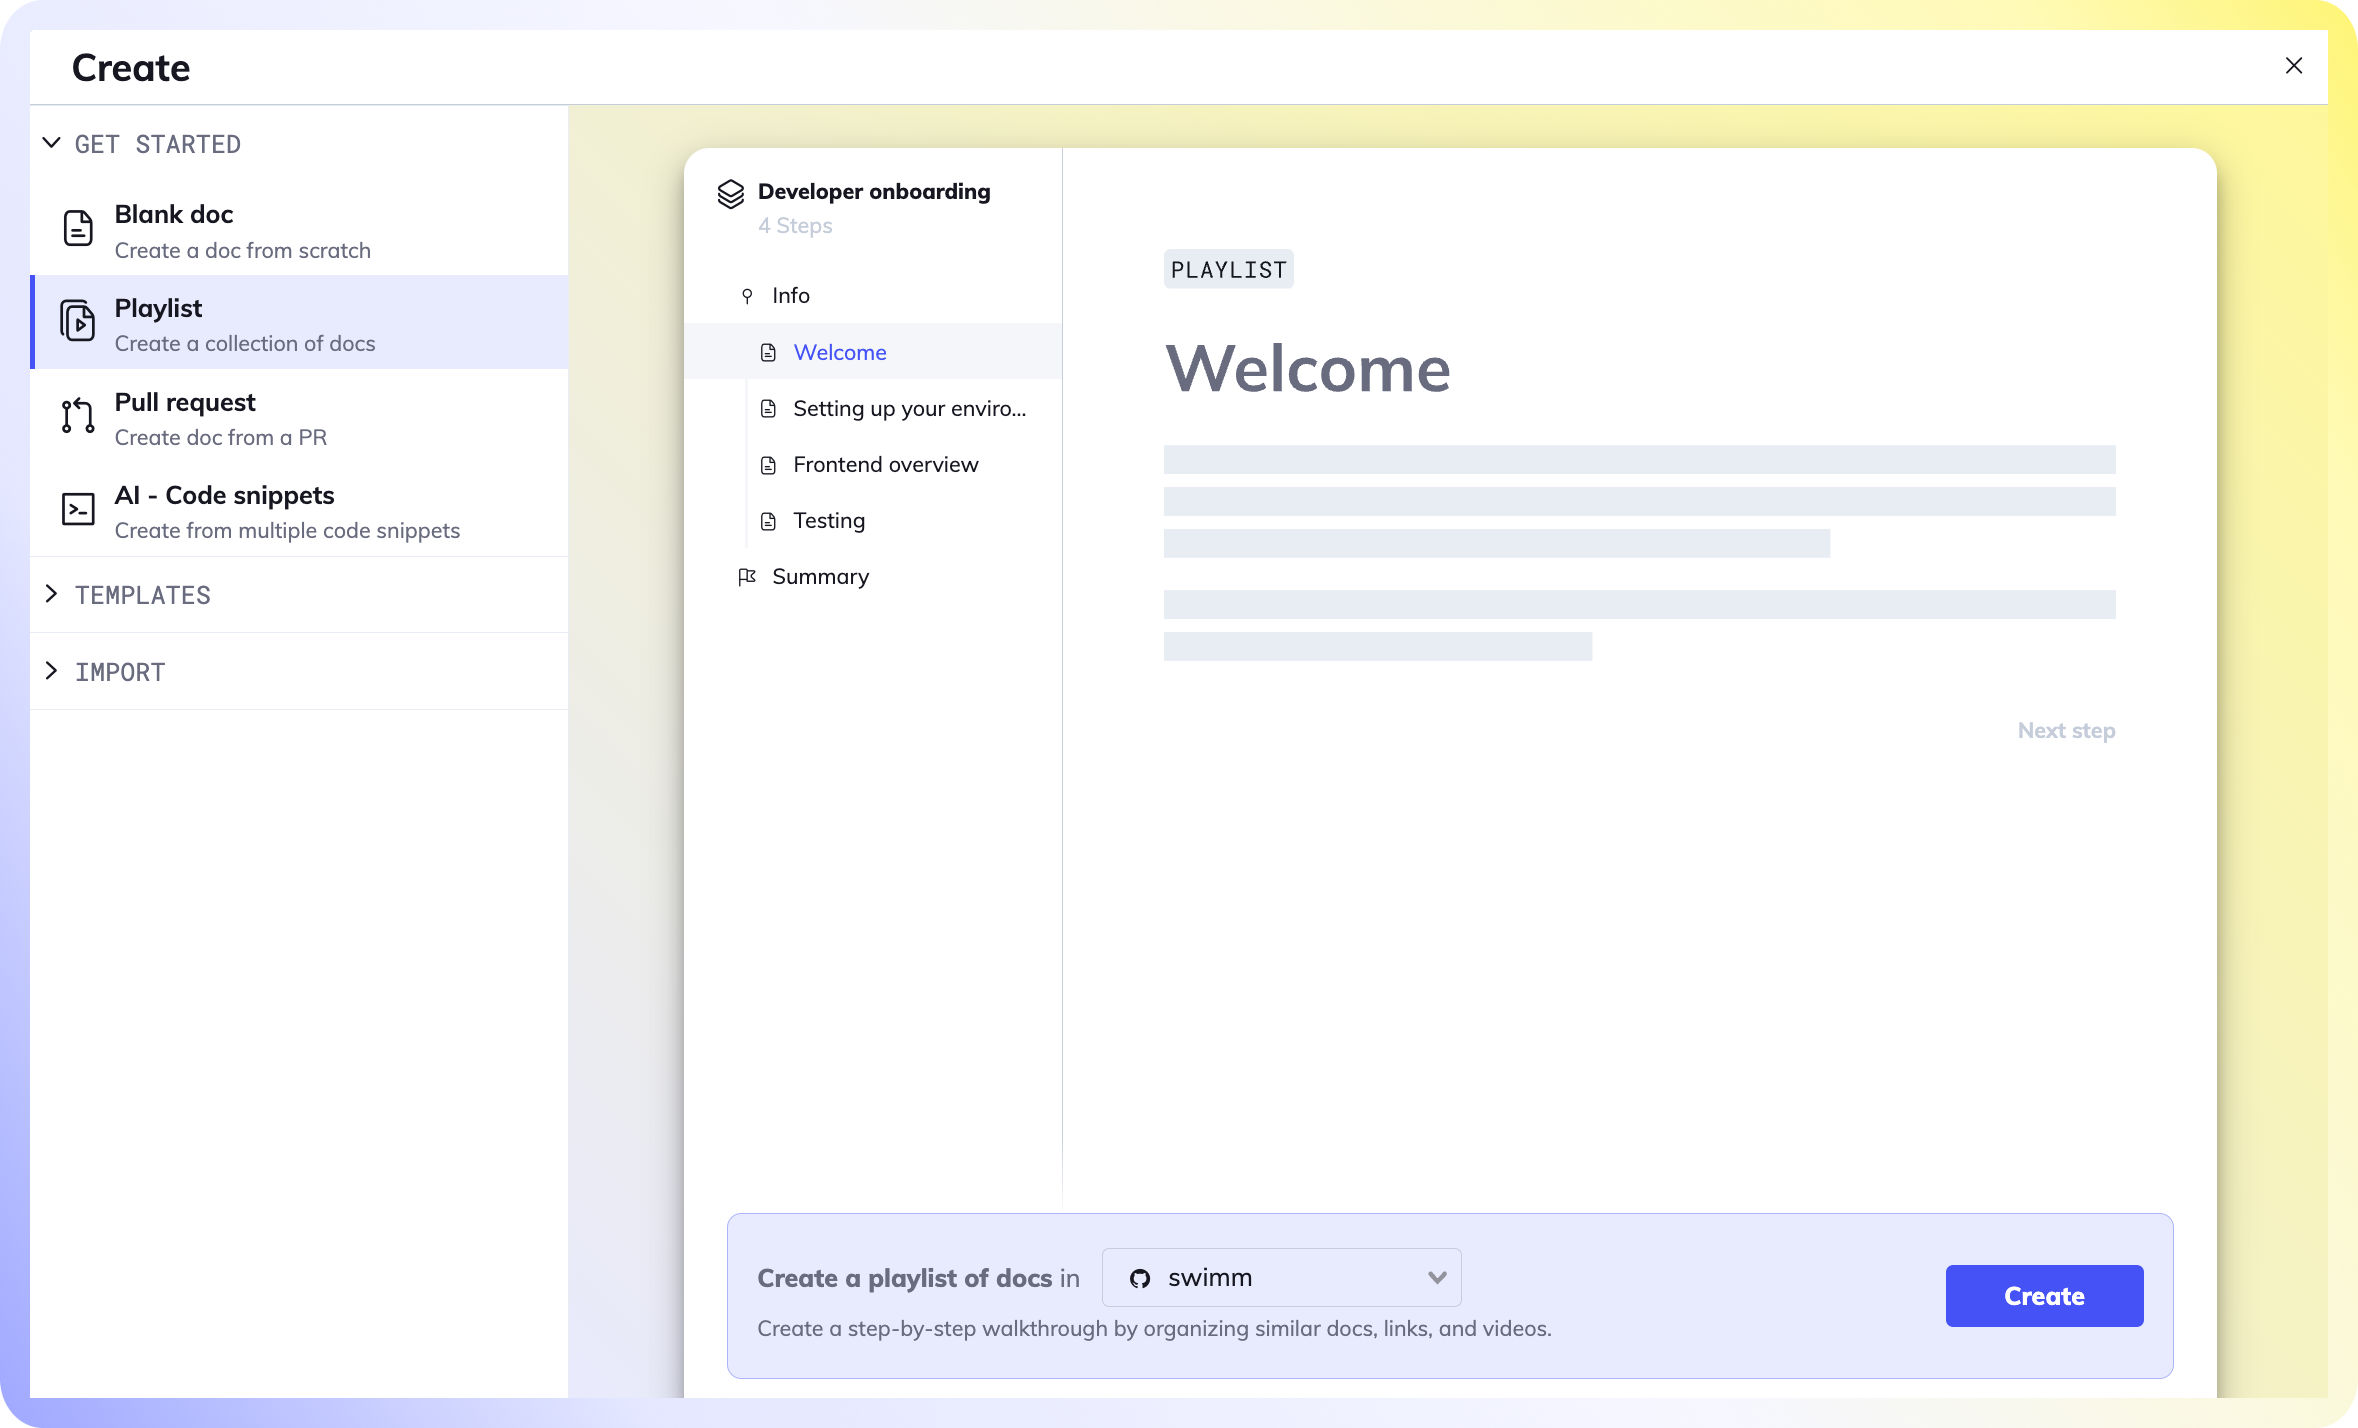
2. In the Intro section, give your playlist a name and description. Add Swimm docs you'd like to include.
If you have separate Playlists that relate to each other, you can nest Playlists within Playlists.
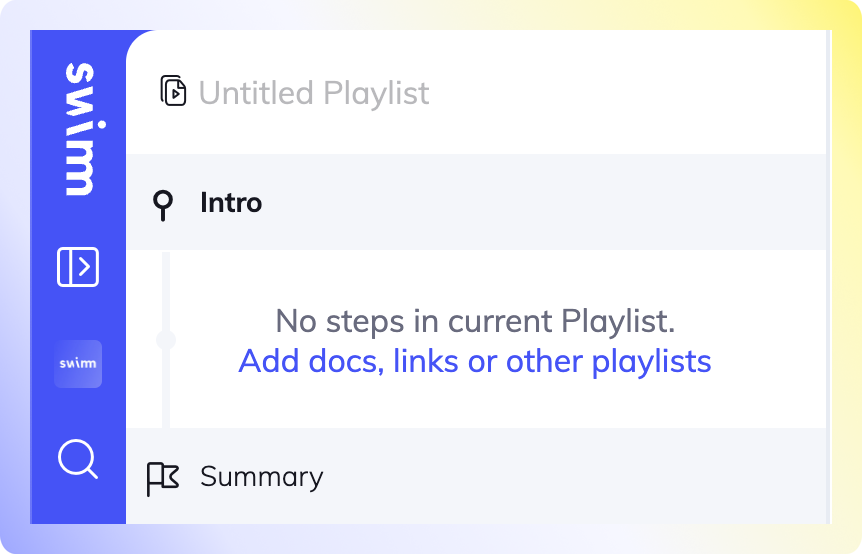
3. Completed Playlists can be accessed within the repository in Swimm
Organize Docs (Swimm Web App)
Folders
Folders allow you to create a hierarchy, by grouping related documents or playlists. Every doc, playlist and folder in the repository can have a parent folder.
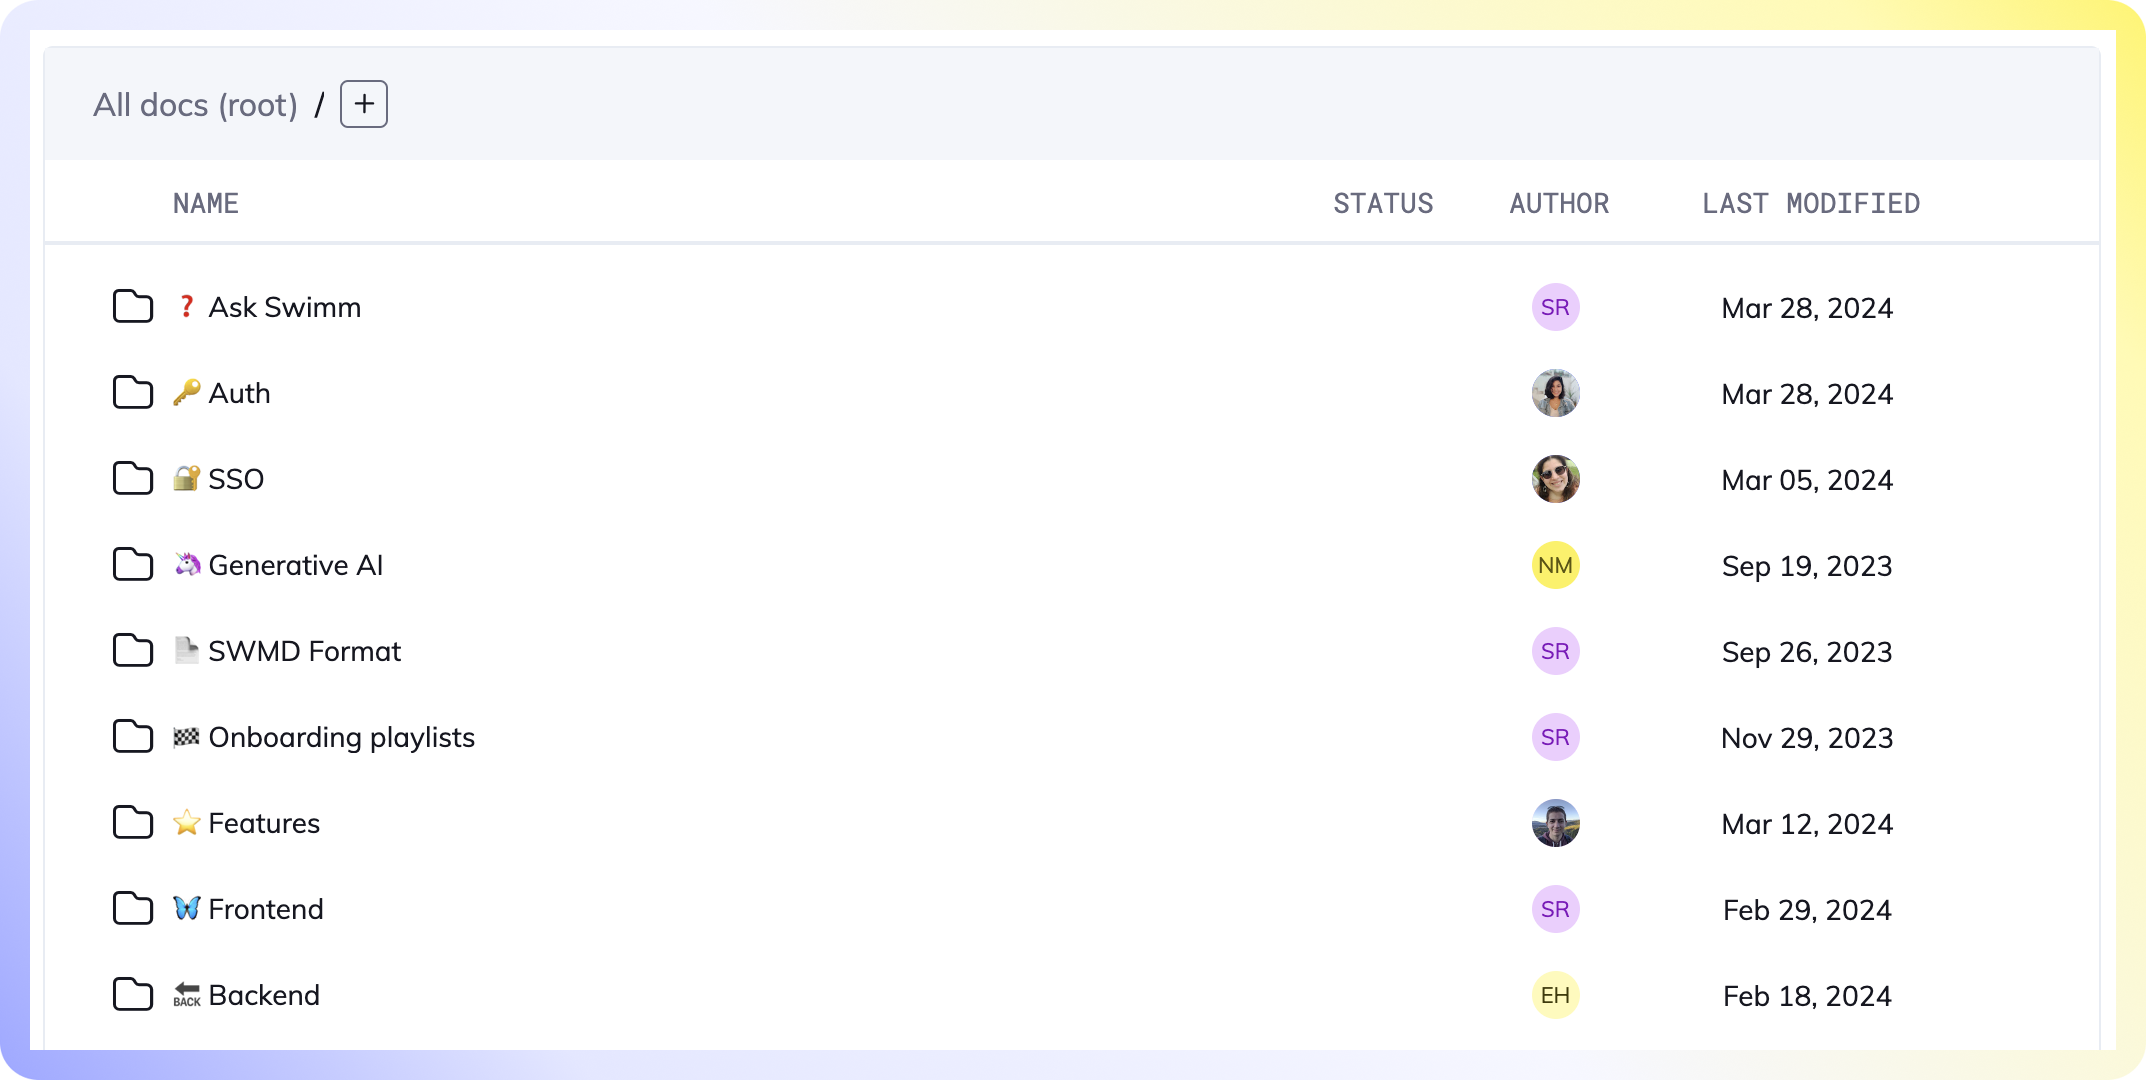
Learn more about Folders.
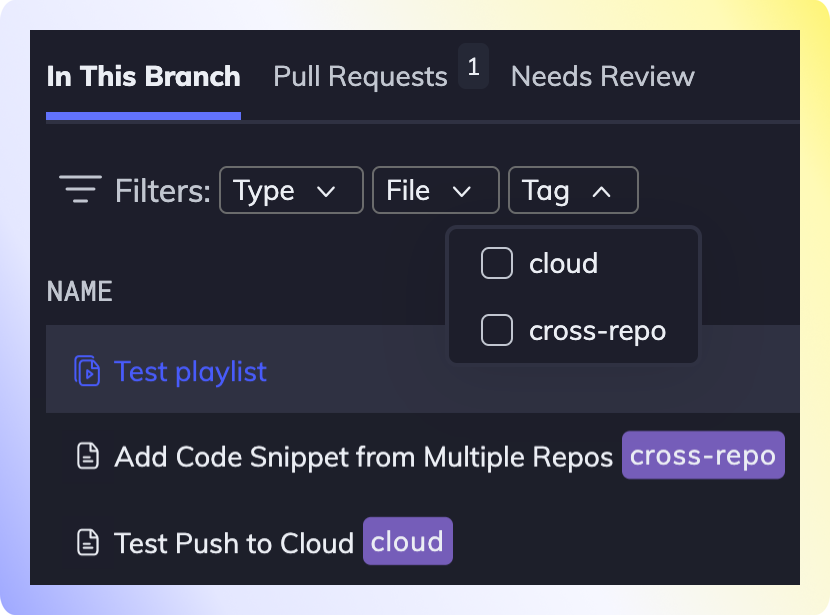
Tags
You can put tags on each doc, and then filter the tags in your repos to quickly find relevant documents. Tags can be assigned to local drafts, as well as docs that have been committed to the repo. When a tag is created, it can be used across all of your workspace repositories.
3.4 Best Practice Guides
Here are a list of Swimm guides to download and share with your team.
| Command | Description |
|---|---|
| Writing tips | This guide will teach you how to write effective documentation in 5 steps. |
| /ask Swimm | Our AI assistant that answers technical questions about your codebase using your Swimm docs. This document describes best practices to get the most out of /ask Swimm. |