Promoting testing best practices
This is a part of our use case guide series, exploring how code-coupled documents can help engineering teams thrive.
Best practices stem from experience, understanding what works well and what doesn’t. Adhering to best practices can help avoid mistakes, Yet, promoting best practices across the organization can be challenging, especially over time. Using code-coupled documents can greatly assist, and in this post we will show you how.
General considerations when promoting a new testing tool
In case you are promoting a new testing tool, there are a few things to consider.
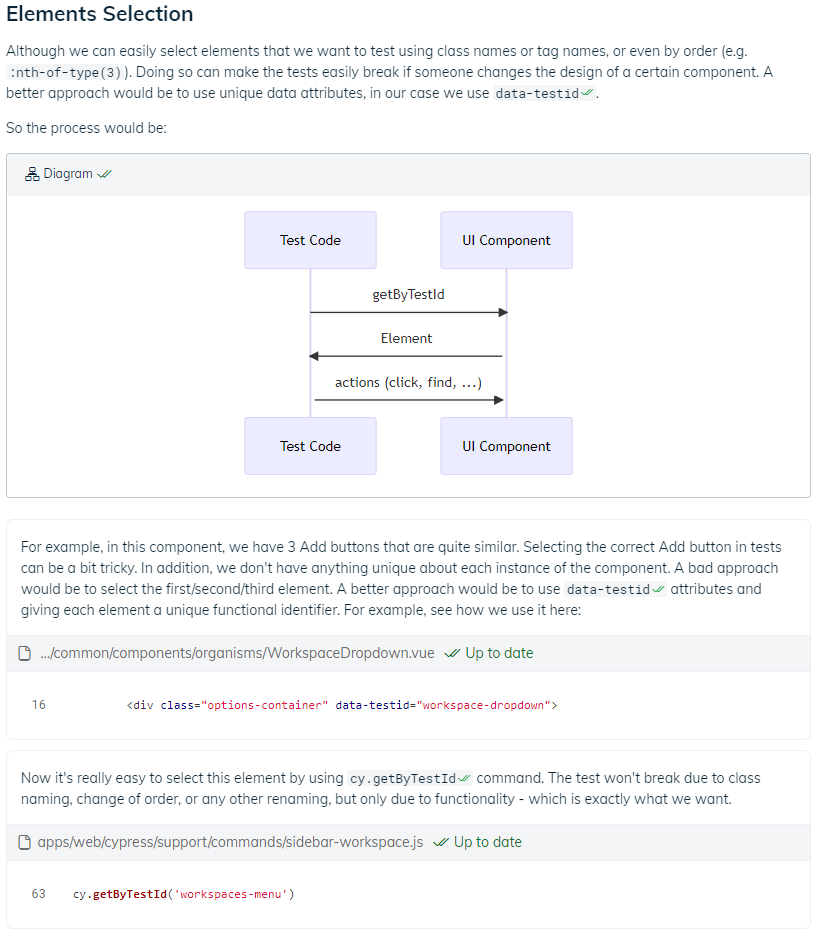
Developers are often overwhelmed with different tools they need to know and use. Be clear about the motivation for introducing a new tool. Why is it important that you use this tool and not implement the functionality yourself?
Each third-party tool comes with its caveats - dos and don'ts. When using a third-party in your codebase, best practices documentation state specifically how and why you use it. This information is rarely found in the library's external documentation. If it is - it's hard to find because it is surrounded by generic details that do not apply to our specific use cases. Furthermore, using all of the functionality within a third-party is very rare, so we focus on a subset of this library's functionality - the functionality that is used within the codebase.
When using a wrapper to hide most of the internal details of how we use the third-party library, it's important to describe how to use it including how it operates and what underlying assumptions were made when implementing it.
Explain the different test types
Different engineering organizations rely on different tests for different cases. Some depend only on E2E tests, while others may rely heavily on component and unit tests including some specific tests for a specific important component.
Be sure to have a clear resource explaining which tests should be written for each case. This will help engineers know when they are expected to create each type of test.
Each test type and tool may require its own section or document. In many cases, each test type has its own specific best practices and may use a designated set of tools. For example, E2E tests like Cypress may rely on a library while AB tests like LaunchDarkly have their own tool. Thus, each test type may require a separate resource document.
Create a testing Playlist
We recommend Swimm Playlists be part of your end goal for explaining tests in your organization. This Playlist should include:
- An overview doc. This document should explain the different test types and when to use each one.
- Relevant tools needed. Explain the relevant tools used and the specific best practices for each test type.
Explain how to run the tests, not just how to write them
When explaining a specific test type, it’s crucial to also explain how to run the tests. While it may seem straightforward to someone who has been using the codebase for a while, remember that whenever someone new joins the codebase, running the tests is one of the first things they need to know., And it is not always trivial as it may include a few tests.
Also, running tests may be done differently for different environments. For example,running them locally requires different steps than running them on every PR or for a nightly build. Be sure to explain the different scenarios.
Pro tip: use snippets and tokens to show how you run your tests
When showing how to run tests, you usually use a command like use yarn test:e2e.
Instead of just writing the command, we recommend showing the snippet where this command is taken from. Take a look at this example below:

Coupling with the code has three major advantages:
- It makes it clear to the reader what is happening under the hood. As opposed to just running
yarn test:e2e, the fact that the snippet is included shows the reader what command is executed (in the example above,cypress open) and where it is defined (apps/web/package.json). - Documentation is kept up to date. Thanks to Swimm’s Auto-sync algorithm and CI integrations, if the command ever changes (for example,
test:e2echanges totest:full), or the underlying command changes (for example - we move from usingcypressto using another tool) - the docs automatically stay up to date. - The document will be found when needed. When developers need to write tests for the repo, they inevitably stumble upon the command that executes these tests. By using Swimm’s IDE plugin, the developers will see if there is a relevant document next to the line of running the tests.
Use real examples
The best way to explain how to write tests illustrating your best practices is to give an example.
Perhaps the most important part is to find a good example using the tool. Note it should be a real example from your codebase rather than a made-up example with pseudo-code. You may need to write such an example if it doesn’t exist already.
Why a (real) example?
- It's easy to understand. As a developer, a real example is easy to relate to. It also provides a good basis to rely on when the developer would look to use the tool themselves.
- It's easy to create such a document. If an example already exists in your codebase, there's no need to invent a new one. All you have to do is describe it.
- It helps you remember. When you look at a concrete, real example - you see all the small implementation details. Not all of them are important to mention or explain, yet it makes sure you don't forget about those that are.
- It's maintainable. By code coupling to an existing example, if something ever changes in the system and the example changes, your document will be updated.
- It's easy to discover. Thanks to the discoverability of Swimm documents, they are found when someone uses this tool. For example, when using a library for the first time, a developer may look for other usages of this library in the codebase, such as the wrapper function. Thanks to Swimm's IDE plugins, developers are likely to find the relevant document next to the wrapper function because it was referenced and code-coupled in the document.
Take a close look at this example below:
Notice that it includes three important parts:
- Motivation. Why we use this best practice.
- The element being tested. In this case, it’s the
workspaces-menu. - The test code. Using a document, we can show the test’s code alongside the element being tested, even though they reside in different parts of the codebase.
What a document for a specific test type should include
- Motivation for this type of tests. For example, if this doc describes component tests, then when we would want to write component tests.
- Mention the main tools being used. For example, Cypress for E2E testing.
- Provide a concrete usage example from the codebase. Mention the important functions that are used.
- Describe the best practices. Dos and dont’s regarding the usage of this library in your codebase.
- Assumptions. When there are specific assumptions or tweaks for the use case of this specific codebase, mention them. For example:
- A workaround to make something work differently than intended.
- Specific configuration details or parameters we pass to the library’s API for some reason.
How to debug tests
Sometimes there are special ways and tips to debug tests of a specific kind. These may include a VS Code extension for debugging tests of a specific library, or a debug function.
Additional reading
Our use case guide for promoting new tools.
This document is automatically kept up to date using Swimm.